


 Comment (9)
Photography is an exhilarating and fulfilling passion or hobby... but quickly expensive. Good news: it is quite possible to make very good images not by investing heavily in lenses and bodies offering a level of sharpness relaxing but by exploiting the technical constraints imposed by its material to play with the blur. We should even talk about blurs instead. Let's explore together how to circumvent your hardware restrictions to your advantage.
Better a good blurry photo than a bad sharp photo.
Master Oogway, (or not)The blurs created by the lens
Focus blur
The symptom:
"When it's not clear, it's blurry." This is a truth that La Palice would not have denied. The fight against blurring of focus is one of the main battlegrounds of manufacturers, who go there with great blows of AF collimators, hybrid laser autofocus enriched with gray matter and learned algorithms. Let's prove them right: of all the blurs, focus blur is arguably the most distracting and unsightly, because it can reduce the visual impact of an image.
The solution :
When the development is missed, for example in portrait when the ear or the nose is sharp whereas you had expressly aimed at the eyes, it is infuriating. The best thing is still to redo a photo, when possible, or to manage with it, by publishing or printing your shot in reduced dimensions, to blur this lack of sharpness. If the focus shift is recurrent, it is possible, on some of the most advanced cameras (generally SLRs) to precisely refine the autofocus according to each lens. It's tedious but effective.
depth of field blur
The symptom:
The subject on which you have made the point is clear. Perfect. That's what you wanted. On the other hand, what is in front of and behind your subject, respectively the foreground and the background, is more or less blurred. Is your camera having a problem? Absolutely not, rest assured. It's even completely normal. Better: many photographers seek to exploit this so-called depth of field blur to isolate and highlight the subject photographed. This blur even has a nickname: bokeh.
The cause :
When a lens focuses on a subject, there is a whole area extending from the foreground in focus to the last in focus. It's the depth of field. The shallower the depth of field, the narrower the area of sharpness: the subject is sharp, everything else is blurred. Ideal for portraits. The greater the depth of field, the sharper the image, with little blurring. Ideal for landscape, architectural photography, etc.
Get a shallow depth of field:
Since today's theme is blur, it boils down to trying to get the shallowest depth of field possible. For this, we will play on three parameters: the focal length of the lens, the aperture of the lens and the distance from the subject. Increasing the focal length, opening wider and getting closer to the subject decreases the depth of field (and vice versa). Note that it is easier to get a nice background blur by adjusting the depth of field than a nice foreground blur. Finally, note that at equal settings, the depth of field will be all the lower as the sensor is large (and vice versa).
Concretely, what should be done? In an ideal world where we all have an unlimited budget, the most effective way to reduce depth of field is to opt for a very bright lens, opening at f/2,8 and below. But we don't live in an ideal world. This leaves the other two levers of action: zooming in and/or approaching the subject, while working at the widest aperture offered by the lens. And sometimes that's enough to brighten up an image!
to read also: 15Use your camera's PASM modes
From compact to SLR, PASM modes, or at least Program (P) mode, are present on all digital cameras. But at...
6 years agoExamples:
Nikon D7100 (capteur APS-C) + AF-S Nikkor 50 mm f/1.4 G @ 1/320 s, f/1.4, ISO 1000
Nikon D610 (capteur 24 x 36 mm) + AF-S Nikkor 600mm f/4 E FL ED VR @ 1/800 s, f/4, ISO 500
">
Olympus XZ-10 (capteur 1/2,3") @ 26 mm, 1/2000 s, f/1,8, ISO 400 mm
">
Panasonic Lumix TZ100 (capteur Type 1") @ 250 mm, 1/400 s, f/5,9, ISO 125
Fujifilm X-Pro2 (capteur APS-C) + Fujinon XF 23 mm f/1.4 R @ 1/60 s, f/1.4, ISO 1000
Sony Nex-7 (capteur APS-C) + Zeiss Touit E 32 mm f/1.8 @ 1/80 s, f/1.8, ISO 100
Canon EOS 70D (capteur APS-C) + EF-S 18-135 mm f/3.5-5.6 IS STM @ 135 mm, 1/60 s, f/5,6, ISO 100
Ricoh GR (APS-C sensor) @ 1/800 sec, f/2,8, ISO 100
Optical blur quality
If previously we saw how to increase the amount of blur by playing on the depth of field, it is also possible to play on the quality of the blur. And in this little game, it is often the lenses that are poorly rated during conventional tests on the test chart that do the best. Some manufacturers have even made it a specialty: Lensbaby, Lomography, Meyer-Optik-Görlitz, to name but a few. Good news: most of them are "inexpensive" optics. Among these defects, that of aberration of sphericity cuts the share of the king. This is a geometric aberration that creates a more or less circular background blur.
Examples:
Leica M9 + Noctilux-M 50mm f/1 @ f/1: note the blur rotating around the red padlock due to spherical aberration.
Samsung NX300 + 45mm f/1,8 @ f/1,8: the spherical aberration is accentuated by the vault of the metro... unless it's the other way around
Sony Alpha 7 + Samyang 50 mm f/1.2 AS UMC CS @ f/1.2
In another genre, the number of blades in the diaphragm influences the quality of the bokeh. The more slats, the softer the blur; the fewer there are, the harder the blur. One is not better than the other, it's a matter of taste. However, note that the lenses with the most blades are also often the most expensive.
to read also: 34What are the best fixed focal lengths, for less than 300 €
Acquiring a small generalist fixed focal length, whose aperture is often less than f/2, makes it possible to overcome the technical limitations...
5 years agoThe blur created by the subject
Unless you're only shooting static subjects (architecture, still life, etc.), you'll have noticed that subjects have a habit of moving at the wrong time, which can lead to a blurry image. As a general rule, this blur is caused by too long an exposure time, too low an aperture, too low sensitivity, or even a little of all of these at the same time. What to miss his photo for sure? Absolutely not !
The yarn technique
The desired result:
Obtain a sharp subject with a blurred background giving the impression of movement. The spun technique is very popular with sports photographers; it makes it possible to give an impression of speed to the subject and to energize the framing.
The technique :
You can shoot with just about any camera: smartphone, compact, mirrorless, DSLR, ~~grand piano, lemon and olive oil~~ , etc. Only one constraint: to be able to adjust the shutter speed, so as to work below 1/100 s (to be modulated according to the speed of movement of your subject). Then "just" frame your subject as you wish, trigger and follow its movement during the capture of the photo, generally by rotating the pelvis. All that remains is to find a Formula 1 accreditation – it also works with pony racing.
Examples:
Leica M9 + Summicon-M 28 mm f/2 ASPH @ 1/6 s, f/2,8, ISO 800
Leica M8 + Summilux-M 50 mm f/1.4 ASPH @ 1/8s, f/4, ISO 320
Fujifilm X-T10 + Fujinon XC 16-50 mm f/3,5-5,6 OIS II @ 1/20s, f/6,4, ISO 200
Photographing at night: between technique and creativity
The falling night often heralds the end of a busy day but above all the end of what is essential in photography: light...
6 years agoLong exposures
The desired result:
As with the yarn technique, the goal is to give the impression that your subject is in motion. Big difference: here, the background is sharp but the subject is blurred, totally or partially.
The technique :
Long exposures are very useful for transcribing the flow of a fluid or the movement of vehicles (traces of headlights). To do this, you must stabilize your camera, either by placing it on a stable support or, even better, by using a tripod. Then, all you have to do is set a fairly slow exposure time (less than half a second to several seconds), activate the self-timer if necessary (to avoid motion blur), then leave the camera work for you. A low sensitivity will be preferable. In broad daylight, do not hesitate to use a neutral density (ND) filter to limit the risk of overexposure.
Examples:
Leica M8 + Summicron-M 28 mm f/2 ASPH @ 2 s, f/8, ISO 160
Sony Nex-7 + Zeiss Touit E 32 mm f/1.8 @ 30 s, f/16, ISO 100
Olympus OM-D E-M5 Mark II + M. Zuiko Digital ED 12-40 mm f/2.8 @ 12 mm, 5 s, f/6,3, ISO 200
Leica Q (Typ 116) @ 0,6 s, f/8, ISO 100
Leica S2 + Summarit-S 70 mm f/2.5 ASPH @ 1/4 s, f/16, ISO 320
Sony Alpha 7 + Sigma 200-500 mm f/2,7-5,6 @ 277 mm, 20 s, f/2,8, ISO 50: the long exposure allows you to transcribe the wind in the reeds.
Learn the technique of light painting
Today at the editorial office, we received a new type of lighting that looks like the lightsabers of the famous saga...
7 years agoEmphasize the blur using the flash
The desired result:
It may seem contradictory and counter-intuitive, but the flash, built-in or not, can be a great tool to highlight the motion blur of your subject. A shot of flash allows, at the beginning or at the end of the shutter, to freeze the subject while leaving the trace of the movement. Butter and butter money ?
The technique :
Here, it will be better to bring a compact expert, a hybrid or a reflex. You have to use a slow exposure time, close the diaphragm, and select in the menus when you want to trigger the flash, at the beginning or at the end of the shutter. This is referred to as "first curtain" or "second curtain" synchronization. First-curtain sync first freezes motion and then lets blur build up. Second curtain synchronization does the opposite: the movement is frozen only at the end. Explore, try, adapt according to needs and conditions.
Example:
Leica X1 @ 0,5 s, f/2,8, ISO 800, Flash premier rideau
The blurs created by the photographer
The blur of moving
Let's end our blurry overview with the main cause of blurriness: you. Well, not you personally, but the photographer in general. Because the photographer can move, even imperceptibly; these blurs are called "move blurs". To thwart them, manufacturers are deploying all their ingenuity through increasingly sophisticated optical and mechanical stabilization systems, or even both. As before, motion blur finds its source in too slow a shutter speed, too low an aperture or too low sensitivity. Added to this is a fourth factor: the focal length. The longer the focal length, the greater the risk of movement. So, since a slight motion blur is often unsightly, let's go cheerfully and force the line by deliberately moving the camera during the shot. But beware, not just anyhow!
The yarn technique
The technique :
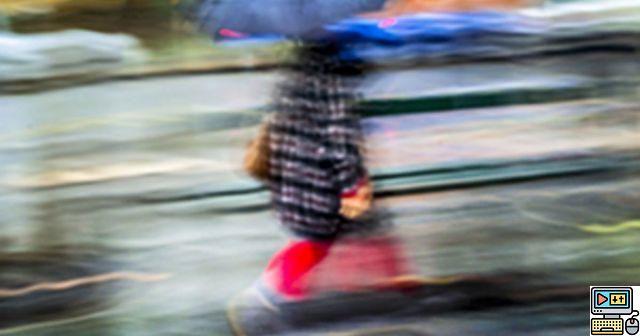
It is identical to the one mentioned above, with the difference that you will voluntarily move to follow your subject instead of just turning on yourself. Ideal for street photography, to capture the playful footsteps of pedestrians, or to "mix" different light sources.
Examples:
Panasonic Lumix FZ18 @ 28 mm, 4 s, f/2,8, ISO 100
Leica M8 + Summicron 28 mm f/2 ASPH @ 1/3 s, f/5,6, ISO 160
Leica M8 + Summicron 28 mm f/2 ASPH @ 1/11 s, f/8, ISO 320
Le zooming
The desired result:
Do you want to give the impression of being caught up in the image, superluminal speed? Zooming is for you.
The technique :
Only one constraint: to have a zoom with a manual zoom ring, which leaves almost all compacts and bridges on the floor. The idea is to turn this ring very quickly, during the release, from one end to the other. Zooming works best by perfectly centering your subject. Try it, because it's fun, but don't overdo it, because it quickly gives you a headache.
Examples:
Canon EOS 80D + Tamron 18-200 mm f/3.5-6.3 Di II VC @ 61 mm, 1/25 s, f/13, ISO 100


