


 Comment
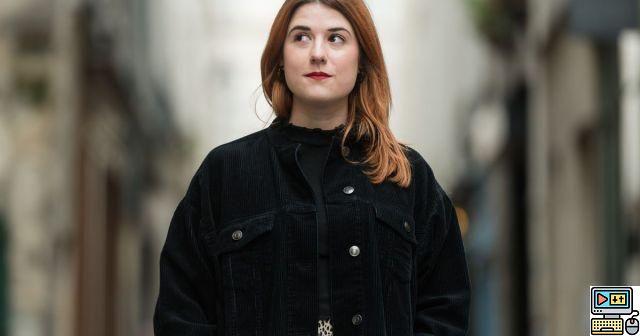
Whether you are outdoors or indoors, natural light can be your best light source. Sometimes too hard, too soft, always variant... we are going to see different techniques to master natural light.
© Samuel Boivin
In this article, we are not going to go into length on portrait shooting techniques, the different possible framings, the setting of your camera, nor on the optics or how to direct your subject. What really interests us here is the management of natural light in order to improve your shot, an element over which, unlike others, you have little control and with which you will have to learn to compose so that your final image resembles your original idea as much as possible.
Pick the right time
Light changes throughout the day, so whenever possible, when planning your portrait session, try to choose an ideal time range, i.e. close to blue hour or just before and during golden hour. These two times correspond to sunrise and sunset, times of day when the sun is still relatively low and warm, when horizontal light casts long shadows and floods subjects with warm light.
On the other hand, we often hear it said that we must avoid the time slot of the midday sun, which is too harsh, direct, which creates unsightly shadows that do little to highlight the subject. Unfortunately, it is sometimes impossible to do otherwise and you will have to learn to compose. You can then take the opportunity to play with the transitions of hard light and shadow to create an atmosphere. This atmosphere will in fact also be harsh, very contrasting. If this is not the desired effect during your photo session, you will have to look for the shadow of a building that hides the sun, or of a tree that dims the light.
© Samuel Boivin
Last solution available to you to deal with the harsh light of noon, opt for an ND filter. Because the light is so bright, sometimes even with minimum ISO setting and maximum shutter speed, especially if you want to open the aperture wide, the brightness will still be too strong. The ND filter will help you correct this problem by reducing the light entering your sensor by 1EV, or more depending on the filter. In this case, make sure your subject doesn't have too much sun in their eyes, to avoid squinting in the photos.
to read also:
Optical filters
5 years agoLearn to read the sun
Planning an outdoor photoshoot isn't just about looking ahead to whether it's going to be rainy, sunny or cloudy. It is also necessary to know how to anticipate the path of the sun in relation to the chosen place. To do this, a great knowledge of the shooting location and the sun will help you determine if the chosen location will be in the shade, if you will be against the light, etc.
It is quite possible to anticipate the brightness and intensity of the sunshine in advance once you have determined a specific location with your subject. You can in fact choose a time slot that corresponds to the desired effect. Or conversely, if your model is only available during a given time slot, offer them shooting locations corresponding to perfect sunshine on this time slot.
If all this seems complicated to you, don't worry, today there are many applications that will do it very well for you. For example, the Sun Seeker and Position Sun applications give you classic information such as sunrise and sunset times, but also its location throughout the day, according to a precise position on a map or in virtual reality. This will make it easy for you to anticipate the path of the sun for your photo shoot.
© Samuel Boivin
Master the Shadows
As seen above, photographing outdoors is not always easy and can have many surprises in store for you. Since natural light is not as reliable as a flash or a spotlight, the brightness can change quickly and, in any case, the lighting will never be exactly what you expect.
Many shadows can come to disturb your work, whether it is those caused by the passage of a cloud mass which lowers the ambient luminosity or on the contrary a sun which becomes stronger than expected and which marks the shadows. You will have to learn to compose to circumvent the problem and make it an asset. Shadows can add shape and meaning to your photo. Their mastery will help you bring body and relief to your portrait while emphasizing facial features and expressions.
Another advantage of taking your portraits in the shade: the light is distributed all around the subject in a harmonious way, without marking the shapes of the face too much, giving a much smoother effect to the skin and refining the features.
© Samuel Boivin
Use diffusers and reflectors
Too often underestimated by photographers, diffusers and reflectors are nevertheless recommended for portrait photography. The reflector is used to unblock an unsightly shadow while the diffuser attenuates a light that is too harsh.
The reflector is placed facing the sun to reflect its light in the direction of your model to illuminate it. The amount of reflected light depends on its size and color. There are 3 main types of reflectors: white which reflects more diffused and soft light, silver which reflects a greater amount of harsh light, and gold which is similar to silver but tends to reflect harsh light. hotter. If you don't have one on hand or don't want to buy one commercially, you can easily make one with whatever comes to hand (polystyrene, large sheets of paper, aluminum) or even place your subject close to any reflective surface around you.
© Samuel Boivin
Conversely, the diffuser is used to attenuate too harsh a light and is placed between the subject and the light source. On the market, it is easy to find diffusers for flashes and light boxes that can also be used in natural light. However, in natural light, the size of the diffuser must often be much larger than that of the trade. In this case, even more so when you take your portrait photo indoors without flash, you can install curtains on the windows, or even better, a slightly opaque shower curtain to filter the light. With this kind of trick, you break the rays of the sun to obtain a softer and more uniform light and thus greatly reduce the shadows on your model.
© Samuel Boivin
Master the background
Also pay close attention to the brightness of the background, especially if you're shooting in the shade. In this case, your background should not be in direct sunlight, and not much brighter than your subject. Indeed, if your subject is placed in the shade and the background is much brighter, you risk burning it. The difference in brightness between these two planes may be too great and one of the two would then be overexposed. If, within a certain limit, it can be beautiful, too marked a difference will result in a failed photo.
© Samuel Boivin
Failing that, exploit the backlight
Because despite all these tips you couldn't do otherwise, or simply because it can also be very artistic, don't hesitate to photograph a backlight. If it is avoided as much as possible in portrait photography, well controlled it can give your photos an original and warm luminosity, an impression of a luminous halo that encompasses your subject.
However, controlling the backlight is not always easy and to do it well, do not hesitate to place the sun directly in the lens to use flare (the reflections produced by the sun in the lens) . Preferably shoot during golden hours to capture a warm hue; and why not use a reflector to create a little shadow on your subject, which will not benefit from a lot of direct light.
© Samuel Boivin
To learn more
to read also: 14Portrait photography in natural light
Portrait photography is generally approached using two very different methods: photographing on the fly, reportage style,...
6 years ago


