


 @Lesnums) Posted on 20/09/17 at 14:00 Share:
Last part of this series of articles dedicated to astro shooting with conventional photo equipment (no glasses, no mount to compensate for the rotation of the Earth), we will discuss together the third highlight during your project shooting: the processing and retouching of your photo.
Read also
Tripod astrophotography: technique and settings
4 years agoRead also
Tripod astrophotography: technique and settings
4 years ago
Crédit photo: den-belitsky
Process and retouch in DxO Optics Pro and Lightroom
Which software for which actions?
DxO Optics Pro and Lightroom are both excellent photo editing software, complete and affordable from a technical point of view, which can be used to process your shots of the night sky. Both similar and complementary, they can transform your photo and make it even more beautiful than it already is, or make up for the flaws in your lens!
DxO Optics Pro is a very good derawtizer: its functions of optical correction, noise reduction (PRIME module in the latest versions), improvement of the dynamics of the image, tones and microcontrasts, are powerful, but to be handled with care at the risk of “overprocessing” the image. In the context of astrophotography, it can be used as software to process the image, that is to say reduce or eliminate its defects before continuing the retouching in another application.
Lightroom, Adobe's famous software for photographers, is also quite comfortable with night photos, especially in terms of editing. It shares many tools and functions with DxO while being slightly less efficient than the latter, but it makes up for it on functions inherited from Photoshop (brushes and gradients), which allows you to retouch part of the image locally . Practical for reducing light pollution or revealing the ground a little, without the sky being more exposed (we will see this a little further down)!
Astrophotography images can only be processed on one or the other; however, by combining the processing power of DxO and the flexibility of use of Lightroom, you will obtain more finished images.
The following processing steps are in a determined order, a recommended workflow which consists first of processing the image to reduce/eliminate defects, then of retouching to improve its aesthetics.
Adobe Lightroom 6
-
Microsoft Office 2021 Home and Student
 Best price: 9.78 €
 View
View
-
Microsoft Windows 10 Home
Best price: 3.95 €
 View
View
-
Microsoft Windows 10 Pro
Best price: 0.99 €
 View
View
-
 Fnac.com Marketplace occasion
96,84
Fnac.com Marketplace occasion
96,84
-
 Amazon Marketplace occasion
97,83
Amazon Marketplace occasion
97,83
Vignette corrections + deformations
Addressed in the first part of this series of articles, vignetting and distortions (we are not talking here about coma, but perspective distortions) are faults to be limited as much as possible.
DxO and Lightroom each offer an optical correction option based on the EXIF data of your image, namely which lens was used. This data is present if you save your image in RAW format. On DxO, a window appears when it detects the use of a new body/lens combination for the first time (as a reminder, DxO carries out numerous tests and offers them online on its website https://www.dxomark .com/), and prompts you to download the optimized fix for your hardware. On Lightroom, the list of corrections is fed by software updates.
How to proceed : On DxO, once the correction profile is downloaded, it's automatic; you will see the preview of your image change, become “flatter”, and its edges will be less dark. On Lightroom, you have to go to the Lens corrections section, then Activate the correction profile to see the same effect.
Reduction of chromatism
Chromatism is this small undesirable effect on the brightest stars: they surround themselves with a purple ring, caused by the bad management of the diffraction of light by the optical train of the objective. By closing it a little, you can reduce this defect (see first part). Software processing will completely eliminate this problem.
How to proceed : On DxO, it's the Chromatic Aberration module that takes care of this (don't hesitate to zoom in the image to check the rendering). On Lightroom, you have to go to the Lens Corrections section, then Manual, and move the Value slider of the Remove purple fringing part.
Noise processing and sharpness
An important step in the processing of your image, reducing noise and managing sharpness in parallel can sometimes be tricky. It is necessary to both “smooth” the areas where the noise is very visible, without erasing the faintest stars or diluting the edges of the objects/stars on the whole image.
How to proceed : On DxO Optics Pro, you have 2 choices: the Noise Reduction module offers an HQ quality present on the 2 versions of the software, similar to that of Lightroom; but we will mainly focus on the second quality, called PRIME, available only on the Elite version of the software. Very powerful, PRIME will allow you to preserve the details of your image while unifying the background of the sky. Zoom in on the image to check each change. The Unsharp Mask module can refine the sharpness of the image, but be careful not to add too much: the appearance of a black halo around the stars tells you that you have pushed the sliders a little too much. On Lightroom, the Detail section offers you to play on sharpness and noise reduction.
Be careful again: making an image too sharp will bring out the noise, and smoothing it out too much will create a "misty" and slightly blurry image (in line with "negative clarity", sometimes very badly used...). We must therefore find a compromise between the 2. Do not hesitate to move the cursors while keeping an eye on the image!

White balance
The next, equally important step is determined by how you want your image to look. Depending on the visible light pollution, the presence of the Moon in the sky and the desire to see a rendering closer to reality (more neutral/warm shades) or much more aesthetic (bluer sky), the balance will not be the same .
How to proceed : Both programs offer a white balance tool, symbolized by a pipette. To restore this balance on an astro image, you must use this tool on a dark area of the sky, without going to a star. The software will then set the color of the selected area as the reference color and modify the temperature and tint of the entire image. In the majority of cases, the latter will regain its natural hues at once, but it is also possible to have an image that drifts towards purple or green. In this case, it is necessary to go through a manual calibration using the histogram. The goal is simple: all the color hues must be aligned in the same place on the histogram, and you will thus have the right balance (using the Temperature and Color sliders). As written above, you are free to choose a natural balance or a little colder to make the sky bluer, without going overboard!
On the left, a cooler balance makes the sky bluer and the light pollution whiter. On the left, the "real" white balance with the colors almost all aligned on the histogram (despite the preponderance of yellow/orange). Its 2 types of scales are valid, it's up to you to see which one you like the most: the aesthetic or the natural!
Adjusting exposure, selective tones and microcontrasts
Once the defects have been corrected and the colors have been restored to your image, you can tackle its exposure and establish the one that seems most appropriate to you, according to the scene of your image, your personal tastes or your visual culture in astro photography.
Selective tones are also an interesting part, because they can add dynamism to your image: by adjusting the blacks, whites, shadows and highlights separately, you can reveal a little the often relatively dark ground, reduce light pollution a bit, play against the sky…
Note that on DxO Optics Pro, the Smart Lighting tool does very well for night photos by making it possible to make dark parts of the image better exposed, without affecting noise.
How to proceed : Here, the simplest method is to vary the sliders of exposure and tones while looking directly at the rendering on the image, as well as on the histogram – we advise you to take a look at our article explaining how to read a histogram.
to read also:The histogram
6 years agoSaturation/vibrance
Last adjustments to globally retouch your image before moving on to more localized retouching, the saturation and vibrance adjustments are both determined by the image as well as by your personal tastes and the image style you want to aim for (we will see the different types of renderings below).
How to proceed : 20-30% Saturation/Vibrance for each usually does the job without overdoing it, because an image with a sky that is too blue, light pollution that is too yellow doesn't really look good… Prefer subtle colors and gradients to a rendering that is too “marked” by over-saturated areas!
On the left, the original raw. On the right, a rendering possible with all the corrections and a white balance pulling a little towards the blue. The light pollution has been increased to show that even in the middle of Queyras in the Alps, we are unfortunately still a little affected by it.
Some useful tweaks
Once your image has been processed and retouched as a whole, you can tackle a few additional steps to perfect its rendering.
Reduce and work on light pollution
If your image has a portion of the sky with too much light pollution on the horizon in terms of exposure or color, you can reduce it with some Lightroom features.
How to proceed : With the Graduated Filter or Retouching Brush tool, you can apply a local decrease in exposure and/or highlights to a selected area, then modify the color of this light pollution to make it tend towards golden hues at the instead of its usual unattractive yellowish/bronze hue.
Increase the luminosity of some stars: the “Akira Fujii style”
Akira Fujii, a Japanese astrophotographer considered one of the greatest in this discipline, is particularly known for having taken images of the sky with certain stars surrounded by an aura of colored light, as if surrounded by a local fog. Through the use of filters like the Cockin Fog or the Hoya Softener, the brightness of the brightest stars is spread over a larger area of the image; we can thus locate the constellations on the images much more easily.
How to proceed : In Lightroom, using the Retouching Brush tool set to a small diameter, a moderate exposure (+0,50) and a moderate saturation (+3%), “point” the stars of the constellations you spot on your image (the ones being brighter than the others). Be careful not to have a tool diameter that is too large!
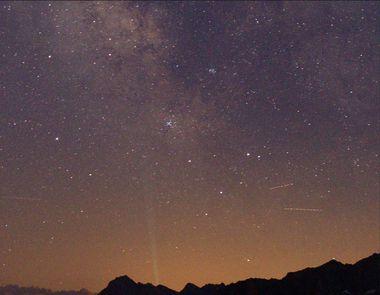
On this panoramic image, we can easily guess some stars brighter than others. The constellation of Orion is very recognizable. Its stars have been slightly more exposed and surrounded by a slightly brighter area. The Akira Fujii style can be much more visible, it only takes a little research on the Internet to realize this.
Remove Aircraft/Satellite Trails
Often, an airplane or a satellite appears on your images. If it can make a certain effect interesting, the majority of the time, we don't want it: luminous lines then form on the photo. Good news, this can be very easily removed.
How to proceed : Using Lightroom's Blemish Removal tool, highlight the light trail caused by the plane or satellite, and the software will automatically look for a nearby area, similar in brightness and textures, to duplicate it and “lay” it over the line of light. The effect is rather stunning the first few times, because it works very well! Note that this tool is also available on DxO Optics Pro.

Homogenize the background of the sky & reveal a little more the ground (exposure)
If your image has areas of the sky that are too dark, or even a foreground that is a little too dark, you can correct these areas locally. Be careful though, this method quickly shows its limits. You have to be careful not to see these retouchings in the sky and not to force the exposure to make the ground appear at all costs, which was in complete darkness, at the risk of seeing an “oil painting” effect. (caused by the poor signal/detail of this area and the noise reduction) of a relatively questionable aesthetic effect.
How to proceed : With the Retouching Brush tool (again), go over the areas that you consider too dark, or on the contrary too light. Slightly vary the settings for exposure, shadows and whites, temperature or saturation.
Know how to retouch without excess
Do not push the sliders all the way
The desire to process our images to make them as beautiful as possible is understandable, at a time when we see magnificent shots on the Internet, colorful and luminous, made possible by ever more efficient hardware and more powerful software. However, you have to know when to stop at the right time, at the risk of falling into the sometimes unfortunate trappings of image editing. Thus, having images that are too saturated, exposure that is poorly managed (image that is too dark), an “HDR effect” that is too present (over-representing the structures of the Milky Way, for example), a sky that is far too blue, these are errors to be made. avoid as much as possible. Astrophotography is a discipline that must show the beauty of nocturnal landscapes and the sky with accuracy and subtlety; even if artistic interpretation and expression are important and even recommended to have fun and perfect the shot, a beautiful retouch can be considered as one that knows how to be discreet and natural, or even completely forgotten.
Lire aussi
to read also:Astrophotography
Space, the frontier of infinity towards which TechnologiesTips travels. His mission: to explore strange new worlds, discover new...
4 years ago


