


Index
Preliminary information

Prima di enter the live tutorial, walking to spiegare how to enter BIOS Windows 10, there is some preliminary information about it that I need to give you.
First, let's try to understand what exactly this is BIOS. Acronym di Basic Input-Output System, as mentioned at the beginning of the tutorial, it is a small piece of software that resides in a chip located on the motherboard of the computer.
Its main task is to make all computer peripherals work, such as the motherboard and USB ports, making them available to the operating system, which will be started later. It also allows you to obtain basic information about the computer and all its peripherals, the operation of which can possibly be altered by means of specific settings.
Considering that some parts of the BIOS can affect extremely delicate functions related to the PC, such as processor management and the control of fans and temperature, it is necessary to pay the utmost attention during its use, as the incorrectly performed modification of certain parameters could compromise the functioning of the computer or, in the worst case scenario, make it even unusable.
Also note that, as mentioned above, on PCs equipped with Windows 10 (but actually starting with Windows 8.x), the BIOS has been replaced by theUEFI, or Unified Extensible Firmware Interface, which uses a dedicated chip and resides in a very specific part of the system disk.
In addition, unlike the BIOS, UEFI has a graphical interface, support for mouse and touch-screen, and has some advanced security features, such as Secure Boot, which prevents operating systems that do not have a correct digital signature from running (which prevents malware from running when the computer is booted). In short, it could be said that the UEFI integrates a sort of small complete operating system.
Enter the Windows 10 BIOS
Having made the necessary clarifications above, I would say that we can finally take action and go and find out, therefore, what are the steps that must be taken to enter the BIOS with Windows 10. To perform this operation, it is necessary to intervene on the system settings and access the advanced boot options.
So, first click on the Start button (I cheer with the windows flag) che trovi nella part in fund to sinistra della taskbar and, from the menu that appears, select the icon of Settings (Quella a forma di ruota d'ingranaggio).
In the window that you now see on your desktop, click on the item Update and security, then click on the wording Restoration that you find in the left sidebar and press on the button Restart now collocato sotto the dicitura Avvio Avanzato.
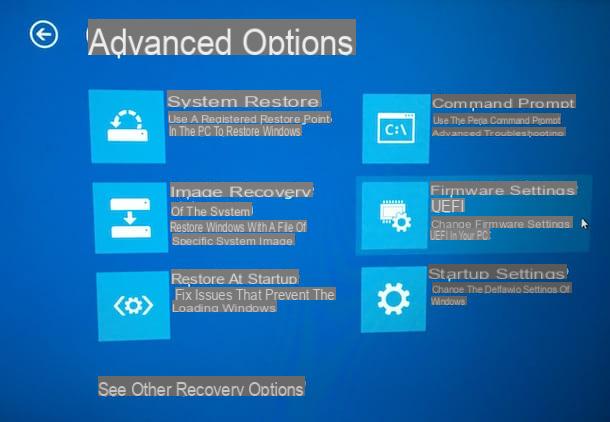
Then wait a few seconds for the menu with the reboot and system restore options to appear, select the icon Troubleshootingwho quills Advanced options and then click on the wording UEFI firmware settings. Finally, click on the button Restart and wait until the computer restarts.
Upon restarting, your PC with Windows 10 installed will automatically enter the UEFI configuration menu. To move within the latter you can follow the instructions you find in the final step of the tutorial.
How to enter the HP Windows 10 BIOS

You own a computer HP and would you like to understand how to enter the BIOS with Windows 10 in this specific case? Well, the indications you have to follow are practically the same as those given to you in the previous step, absolutely nothing changes.
If by proceeding in this way you still do not succeed in your intent, it is evidently because the computer still has the old BIOS and not the UEFI. To work around, follow the instructions below.
- If you are using a notebook, shut down the computer completely (by holding down the key Shift on the keyboard, by clicking on the icon Stop present in the Start menu and selecting the item Shut down the system , to deactivate Quick Start), then turn it on again using the buttons Power o ON / OFF and press the button F1 keyboard as soon as the initial HP logo (or a series of seemingly nonsensical writings) appears. Alternatively, try using the key F10.
- If you are using a desktop PC, turn off the computer completely, wait five seconds, turn it back on and press the button repeatedly Esc on the keyboard until you see the start menu appear. Next, hit the button F10 to enter the BIOS setup utility.
If something is not clear to you or in any case you feel you need further details and insights, you can refer to the support section of the HP website.
How to enter the Lenovo Windows 10 BIOS

You are using a PC Lenovo? Again, to enter the BIOS with Windows 10 you just need to follow the procedure I described to you in the initial step of this post.
If by implementing the procedure in question you still do not have to access the UEFI, it is evidently because your computer is still equipped with the old BIOS. In this case, to remedy, access the Windows 10 menu by clicking on Start button (I cheer with the windows flag) placed on the taskbar, then press and hold the button Shift on the keyboard, click on the icon Stop present in the menu and select the item Shut down the system from the box that appears, in order to completely shut down the computer by disabling fast startup.
When shutdown is complete, press and hold the button F12 and turn your computer back on. After doing this, within a few moments you should finally be able to view the UEFI screen. If the F12 key doesn't work, you can try the same procedure with the keys Canc o F2.
If any steps are not clear to you or if you think you need further explanation, I invite you to consult my article on how to enter the Lenovo BIOS, as well as the support section of the Lenovo site.
How to enter the Windows 10 Asus BIOS

Even if you were using a computer Asus, to access the BIOS with Windows 10 just follow the instructions I gave you in the step at the beginning of the guide.
If the procedure in question is not valid, proceed as follows to remedy: click on Start button (I cheer with the windows flag) that you find on taskbar in Windows 10, press and hold the key Shift on the PC keyboard, click on the icon Stop from the Start menu and select the item Shut down the system from the box that appears, in order to disable the fast start of the OS.
Then wait for the computer to shut down completely, then press and hold the key F2 and turn it back on. After doing this, within a few seconds you should see the UEFI configuration panel. If using the F2 key does not have the desired effect, try to repeat the procedure I just indicated by pressing the key Canc of the keyboard.
If something is not clear to you or if you think you need more details, you can consult my specific guide on how to enter the Asus BIOS and you can try to take a look at the information in the support section of the Asus website.
How to enter the Acer Windows 10 BIOS
And on computers Acer? How do you get into the BIOS with Windows 10? The answer is always the same: putting into practice the procedure I described to you in the passage at the beginning of the tutorial.
If you do not succeed in doing this, it is most likely because the computer is still equipped with the old BIOS and not the UEFI. To fix it, do this: click the Start button (I cheer with the windows flag) that you find on taskbar, then press and hold the button Shift on the keyboard and, at the same time, click on the button Stop present in the Start menu and choose the item Shut down the system from the box that appears. By doing so, you will completely shut down your PC by disabling Windows 10 Fast Startup.
After doing the above steps, turn on your computer and immediately press the key F2. Within a few seconds, you should then be able to see the BIOS screen. If the F2 key does not work, try to repeat the procedure using the key Canc.
If any of the steps are not clear to you or if you need further explanation, read my guide dedicated specifically to how to enter the Acer BIOS. I also suggest you take a look at the support section of the Acer site.
Change the UEFI settings
After having managed to enter the BIOS with Windows 10, or rather the UEFI, you should find yourself in the presence of the relative configuration panel. It is essentially a tabbed screen that contains all the settings on your PC.
However, considering that the menu structure is not the same on all computers, unfortunately I will not be able to give you exact information about it. Furthermore, some items present in the UEFI screens that I am going to describe to you may differ from what you actually see on the PC screen. In any case, do not worry, I will try to explain myself in such a way that you can still easily identify the options of your interest.
Having made this necessary premise, let's get to the facts! First, keep in mind that you should be able to use the directional arrows present on the keyboard: Up down to select an option and Right left to change its value or to switch from one tab to another if the menu at the top of the screen is selected. Instead, by pressing the button Submit you can select an option to change its value.
We then move on to the various sections into which the UEFI menu can be divided.
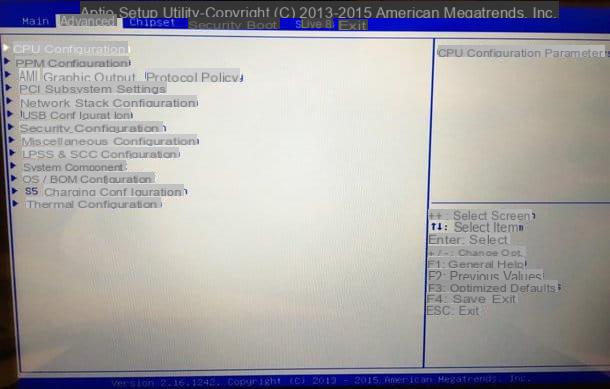
- Main - is the tab where the settings concerning the date, time and information on the computer in use are found.
- Advanced - is the card where the advanced settings on the processor (CPU), network, USB ports and so on reside.
- Security - is the tab where there are the settings on the Secure Boot (if available) and those relating to the UEFI password protection.
- Boot - is the tab where you can find the options to go to change the order of the boot devices and those to enable the Legacy BIOS mode (if available).
- Save & Exit - is the tab where there are the settings to exit the UEFI by saving and applying the changes made to the relevant settings, not saving them, or restoring the default values (i.e. the factory ones).
Among the various settings available, those attached to the card Security and in particular those referring to Secure Boot, Legacy BIOS and boot devices they have greater relevance as regards the installation of a new operating system (as well as its execution in "live" mode). Below you will find more detailed explanations on this.
- Secure Boot - it is a safety function of the UEFI thanks to which the execution of operating systems without a specific digital signature is immediate. To allow the execution of operating systems that do not have a valid digital signature (this is the case with many Linux distros) and therefore to disable this setting, you must go to the tab Security UEFI, you have to select the item Secure Boot menu, then the option Secure boot and then you have to set it to Disabled.
- Legacy BIOS - this is a function that allows you to emulate the old BIOS on computers equipped with UEFI. It can come back to install all those operating systems that do not support UEFI (as in the case of Windows 7). To apply the aforementioned mode on your Windows 10 computer, you need to go to the tab Boot UEFI and set the option Boot mode su Legacy BIOS.
- Order of boot devices - is essentially what the computer follows to start up. In other words, if you want to start an operating system that you have on a pendrive, you must set the boot order by making sure that the USB port comes before the hard disk of the PC (therefore before the operating system installed on the computer). Changing the order of boot devices is simple. To do this, you need to access the tab Boot UEFI and select the option Boat Option #1 on the device of your interest.
After making all the necessary changes to the UEFI of your PC, go to the tab Save & Exit, scegli l'opzione Save Changes & Exit and answer with Yes to the warning that is shown on the screen, so that you can save the changes you have made, restart your computer and start using it correctly again.
Finally, I would like to point out that if you need to check if your computer is using UEFI or Legacy BIOS mode normally you can do it by typing the command msinfo32 in the search field of the Windows 1 or Start menu and pressing the key Submit on the keyboard.
In the window that you will see appear on the desktop, choose the item System resources in the left sidebar and check if at the entry BIOS mode the wording is shown UEFI or that one Legacy BIOS. That's all.
How to enter the Windows 10 BIOS


