


 Comment
Magical night. Here are all our tips for taking your first shots of starry skies. Follow the guide and in this case Maxime Oudoux!
observe the sky is a magical activity, encouraging dreams and contemplation. Practiced through astronomy, it is not incompatible with photography, quite the contrary! The combination of the two gives l’astrophotographie, a discipline still little known at the amateur level, but very active all over the world, with enthusiasts always ready to capture the infinitely large.
However, like most photographic disciplines, it cannot be totally improvised if one wants to obtain an image that is not limited to a black rectangle, what is more when the night is dark (the flash is not no help). Astrophotography is one of the complex disciplines to understand, practice and master, especially in its most "scientific" branches. In addition, it highlights the limits of your equipment, because you will voluntarily push your box to its limits in an attempt to capture photons that have traveled through the interstellar void for thousands of years... Here are some tips for start!
At sunset, a completely different spectacle awaits you and your aircraft, subtle and often obscured by human installations.
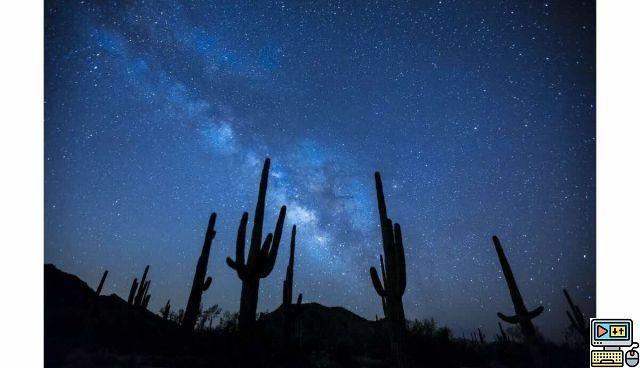
Used for this image: Nikon D7000, Tamron 17-50mm f/2,8 A16 (the "non-VC"); sky settings: 10 sec, f/2,8, ISO 3, 200 mm; settings for Mont Saint-Michel: 17s, f/2, ISO 4, 800mm; digital blending technique: panorama of 17 RAW + 10 RAW.
Photo: Maxime Oudoux
Before you begin
Three major sub-categories stand out in astrophotography.
<br>• The large field (or nightscape) : with a DSLR and a bright short focal length lens, a large portion of the sky is photographed with or without a terrestrial element in the foreground. It requires common equipment and some knowledge of image editing.
<br>• The planetary (includes the Moon) : the planets of our solar system are photographed with a reflex or a CCD camera (a large sensor sometimes cooled by ventilation), with a telephoto lens for the Moon or an apochromatic telescope. This requires knowledge of astronomy and more advanced equipment.
<br>• The deep field (in the jargon, the "CP") : it is a question of photographing very distant and/or diffuse objects (galaxies, nebulae, open and globular clusters...), that is to say which emit very little light: a telescope or a telescope is then compulsory, with an Earth rotation compensation system on the mount (exposure times exceed one minute). A reflex can be used, but using a CCD camera offers the best results. Reserved for sky enthusiasts, the CP requires solid knowledge of both astronomy and image editing to fully enjoy its shots - and justify the purchase of equipment at an exorbitant price from its family...
In this article, we will only focus on the wide field, or "nightscape".
Astrophotography and astronomy are closely linked: there is frequently at least one amateur astrophotographer in an astronomy club.
Here: Nikon D7000 + Tamron 17-50mm f/2,8 A16 (the "non-VC"), 25s, f/2,8, ISO 2, 500mm, 17 RAW panorama. Photo: Maxime Oudoux
Here a small parenthesis is necessary concerning the use of the word "astrophotography". Astrophotography is more about the planetary and the CP than the wide field, because the latter can also be part of nightscapes (hence the name "Nightscape"). Nevertheless, for the sake of readability, I will use this term, at the risk of misusing language.
Basic principles and best practices
The main idea in wide field astrophotography (Nigthscape) is to capture very faint lights from very distant celestial objects. To do this, you will ask your camera's sensor to be very sensitive, open your shutter for several seconds and let a large amount of light pass through a generously open diaphragm, all placed on a tripod.
Preparations
Taking a shot of the sky correctly requires work before it is even taken: you must make sure you have a clear sky during the shots, or else know that you will have to deal with clouds or a slightly veiled sky, which can be interesting. I recommend the sat24.com site, which allows you to follow the advance of cloud masses every quarter of an hour and therefore anticipate their arrival on your site. For the most picky among you, you can also consult the meteoblue.com site ("Diagrams and Tools" > "Miscellanous" > "Astronomy Seeing"); you will access a very practical tool detailing the "Seeing", i.e. the quality of the sky: refer to the "Seeing" group of columns and prefer the times when, in the Index 1 and Index 2 columns, the indices are the highest (4 or 5).
Clouds are not necessarily your sworn enemies: you can use them as long as they don't block the sky... and accurately reflect light pollution, and here the light of a red moon a few moments before it rises. Here: Nikon D7000, Samyang + 35mm f/1,4 AS UMC, 10s, f/2, ISO 4, 000mm, 35 RAW panorama.
The astronomical part is obviously the longest to master if you are a complete beginner, but know that it is not necessary to know everything: the idea is to be able to find your bearings in the sky in order to navigate between easy points of interest. to photograph.
Find your way
The night sky is an immense and fascinating space, in perpetual motion due to the rotation of the Earth on itself and its revolution around our star (giving rise respectively to the cycle of day and night and to that of the seasons ). At night, thousands of stars are visible to the naked eye, more or less luminous, some forming remarkable figures: the constellations (the best known being The Big Dipper or the "Big Pan").
The most impressive celestial object to photograph is the Milky Way: we are part of a huge group of stars rotating on itself - a galaxy. From an external point of view, it generally looks like a very flat spinning top, thicker in the center. Since we are inside, our galaxy is therefore visible from an internal point of view, which is characterized by a diffuse white band going around the celestial sphere (northern and southern hemispheres). A very important point to assimilate is the round of the seasons: this obviously affects the length of the night, the times of sunrise and sunset, but above all the fact that the celestial landscape is not the same in summer or in winter. Thus constellations such as Orion are visible from the beginning of the night in winter, whereas they are no longer so in the middle of summer, because the sun rises and sets at the same time as them.
Another crucial point to consider imperatively for your shot: the Moon. When it is in the sky, it is a real beacon that floods you with light. The brighter it is, the fewer stars you can capture. Default to avoiding it, or to coping with it — the significant benefit is that once the Moon is up, the sky is bluer and the landscape better lit.
Fortunately, to (really) make the task easier, there are software and mobile applications to simulate the sky with a multitude of information, like a planetarium. One of the most famous is Stellarium, a very well-made and easy-to-use free open source program, which I strongly advise you to download to plan your night outings, or simply discover the sky with your loved ones. Your identification on the spot will be even simpler and faster.
Stellarium is an excellent software for discovering the sky, offering both a magnificent and quite realistic rendering, great precision and a multitude of useful (or not...) information to plan your shot. An indispensable tool!
Once you know a little better what is happening up there, look where you will put your equipment, on the one hand to take a nice shot of the celestial vault with an earthly element, such as a tree, a rock, a building , a field..., but above all to escape light pollution.
A clear sky, devoid of light pollution, will allow you to capture the subtleties of the Milky Way, even with a rather modest body/lens pair. Here: Nikon D7000 + Tamron 17-50mm f/2,8 A16 (the "non-VC"), 20s, f/2,8, ISO 2, 000mm, 17 single RAW.
Municipalities and agglomerations tend to use public lighting in all directions and especially towards the sky, which prevents the stars from being seen correctly. The bigger your city, the less stars you will capture (Parisian friends...). Flee towns and villages. To know the places spared, I advise you to study the light pollution map of Spain made by the AVEX association, which opens with the Google Earth software. You will thus discover particularly affected areas (red/white) and others very spared (dark blue/transparent). If you are in the North or other areas plagued (dare I say) by this problem over a large area, find the least affected corner near you - try anyway!
Map of light pollution in Spain with Google Earth.
Equipment
Enclosures
To practice astrophotography and more particularly the Nightscape, there is not necessarily a need to have exotic equipment to get by. As long as you can manage ISO, aperture, and shutter speed (in other words, be on manual), you're fine. Obviously, the better your camera will manage the ISO increases and the brighter your optics, the easier it will be.
With the enclosures entry-level SLRs like the Canon 1100D or the Nikon D3200 equipped with their basic 18-55 mm lens, it is quite possible to get by honorably to start, but you will quickly be limited by the lens for progress. The more you go upmarket in case, the more the images will be detailed and the noise, contained.
Cameras offering very good results are "expert amateurs" of the Nikon D7000/D7100 or Canon 60D/70D type, and the Nikon D600/D800 or Canon 7D/5D for full frames. Don't forget that it is imperative to use a (good) tripod and a remote control if you have one, to avoid vibrations when shooting as much as possible.
The optics
The goals do major work in photography and this has never been truer than in astrophotography. The ideal is to use wide aperture lenses (at most f/2,8) to harvest as much light as possible, and to have low dispersion lenses to avoid chromatism, because the stars love to scatter. surrounded by a purple ring caused by this optical phenomenon. You can eliminate it with editing software, but the best thing is to limit it as much as possible when shooting.
Such optics are generally very expensive. However, there are some "good picks" with excellent value for money, widely used by sky photographers.
In ascending order of price (be careful to check APS‐C/full format compatibility), these are:
• the Canon and Nikon 35 or 50mm f/1,8 – their focal length is quite impractical, but their prices allow a smooth introduction; moreover, these lenses are used for everything in photography!
• The Samyang 14 mm f/2,8 – widely used in astrophotography, it captures a large portion of the sky while having very good optical quality and an attractive price;
• the Samyang 35mm f/1,4 AS UMC – a very impressive lens for its performance, used by night panorama photographers;
• the Samyang 24 mm f/2,8 ED AS IF UMC – more expensive than its 2 brothers, it has an optical quality close to 35 mm with the flexibility of a shorter focal length;
• the Tokina 11-16 mm f/2,8 Pro DX – a wide-angle zoom with unique performance, also very popular in wide-field astrophotography;
• and finally the Sigma 35 mm f/1,4 DG HSM ART – a very high-flying lens, used by the best photographers specialized in the field (with the panoramic technique).
The practice
To maintain an approach that is voluntarily accessible to all, at the risk of ignoring advanced notions for connoisseurs, I choose to construct this part in the manner of a step-by-step presentation: those that I use each time I'm off to take a shot.
It will be broken down into 3 main parts: preparation, shooting and editing.
The preparation
Before embarking on a night shot, anticipate above all the logistical and comfort points, especially if you are going in winter. Do not forget to take clothes adapted to the temperature, neither too hot nor too cold, because you will stay at least 1 hour on the site you have chosen, the time to set up the equipment, to trigger and to put away .
Check your hardware:
• the space available on your card, because you are going to shoot in RAW and it takes up space (we will come back to this later),
• the battery of your device (do not hesitate to give it a charge: in winter, the batteries discharge more quickly),
• the clamps of your tripod (to avoid vibrations),
• the battery of your mobile phone (for the GPS, the pocket planetarium, the flashlight, or to call in the event of a problem).
Last important hardware point: check the daytime perfect infinite focus position, and mark it on the lens. It is not pleasant to realize that once night has fallen, the camera can no longer find the point at infinity, using its rangefinder in vain... I advise you to focus during the day , by aiming at an object in the distance (more than 30 m from you) and carrying out the control via Liveview (by the screen of your case), with digital zoom in the image to the maximum. Once you have determined the perfect point, make a small line on the barrel of your lens and the focusing ring, so that they match perfectly.
Now check the weather sites shortly before your departure, and check that your site is not degraded by light pollution (see the first part above).
Now launch the Stellarium planetarium (see also part one) and watch the sky pattern at the desired time: the position of the planets, the constellations, the Milky Way and... the Moon. Depending on the idea you have in mind for the skyscape, look in which direction and at what "height" your point of interest is.
The shooting
Once there, prepare your equipment in the light of your lamp (if possible with a modest power, ideally red in color to dazzle you as little as possible), then check the tightenings one last time... and switch off your lamp.
Don't do anything, sit down. Take advantage of this moment to observe the sky, the celestial vault is offered to you in all its beauty. At first, you won't see much, but after about ten minutes, your eye will completely adapt to the darkness, and you will see more and more small stars, as well as the Milky Way, which will take the form of a ghostly diffuse ribbon, traversing the entire sky. Find the objects that interest you. You will certainly have to move your equipment to compose with the terrestrial landscape if you wish: light the lamp if necessary, but above all do not look at it directly, all the work of accommodation would have to be redone.
The interest of the Nightscape is to compose a terrestrial landscape with a celestial landscape: select your location on the zone carefully. Here: Nikon D7000, Samyang 35mm f/1,4, 10s, f/2, ISO 4, 000mm, 35 RAW panorama.
First things to do before triggering:
• switch to M (manual) mode;
• disengage in manual focus;
• disable ISO noise reduction (let the processing software take care of that);
• recording format: RAW required! If you save in JPG, you will not have access to optical corrections and will not be able to bring out the small details that make the difference;
• finally, place your focusing ring at the notch/marking you made before leaving
For speed, the lights are so dim that you will have to have a shutter beyond the second. Depending on your focal length, you will trigger between a few seconds and up to 30 s. Remember that the longer your focal length, the more you will have to have a short exposure, because of the Earth's rotation: the stars will end up creating small lines (the "tails") instead of punctual beings.
To get an idea, it is possible to pose up to 25 s for 17 mm, 10 s for 35 mm and 2 s beyond 70 mm without having too many "spuns". As a general rule, we oscillate between 15 and 25 s. Do not hesitate to do several tests to see the difference.
For the aperture, we find the classic principle in photography: the brighter your lens, the better, but be careful not to open too wide. Close your diaphragm a little to recover resolving power, to obtain better defined and sharper stars. With a base kit 18-55mm closed at f/3,5 or f/4, you will end up with rather "smooth" stars, but it improves with an f/2,8 lens closed at f/ 3,5 is even better with those of f/1,8 closed to f/2,8, the best being the optics of f/1,4 closed to f/2.
Finally, for sensitivity, you can go more or less generously depending on the ability of your camera to manage ISO increases: entry-level SLRs have correct images between 800 and 1 ISO but have difficulty at 600 ISO, while higher-end cameras climb quite easily beyond ISO 3. You will see by practice that it is not necessary to go up to the highest each time, because the more you go up in sensitivity, the more stars you will have which will be mixed with the noise of the sensor.
Once you've set up your camera, frame and compose. If you have a remote control, take it, otherwise use the self-timer to avoid vibrating the whole thing when you press the shutter button, it will be seen quite easily on the image.
I repeat, do not hesitate to experiment with several settings on site to see what you like the most: it will be too late when you get home!
Alterations
Last oh so important step of your photographic process: image processing. It is all the more vital in astrophotography, where noise management must be particularly worked out.
Unfortunately, I will not be able to explain to you at leisure the retouching, which can be particularly complex and long to obtain a very good shot, nevertheless I will show you the essential points to respect to have a solid base.
I will base myself on Lightroom, with a logic that adapts to other software.
A raw image is never very satisfactory in astrophotography: it is through retouching (and the properties of RAW) that its full potential is exploited. Use and combine the software you have or don't be afraid to use new ones — you won't have a choice at some point.
First, you are going to have to eliminate optical defects such as vignetting and chromatic aberrations. In the majority of shots taken by those new to astrophotography, these 2 faults are not corrected and the shot is unattractive, with a much darker sky in the angles, and the stars surrounded by a very saturated magenta aura for the brighter.
In Lightroom, go to the "Lens corrections" section then "Profile", select your lens from the list, then in "Color", check "Remove chromatic aberration" and play with the "Value" slider while observing the result on a star.
Vignetting is visible on the top left of the original image, which can cause serious differences when editing lights and exposure.
The next step is the most important: you will have to choose between reducing the noise more or less significantly, which will erase the weakest stars, and increasing the details, which has the effect of increasing the noise.
To do this, go to the "Details" section and play with the gain slider in "Sharpness" to observe the rendering on the image; it is generally not advisable to go up to too high a gain.
Then, play with the "Radius" slider to better detach the stars of average luminosity from the background of the sky, but be careful, you will increase the noise quite significantly: go sparingly. To manage this processing quite finely, hold down the "alt" key while you move the cursor on the slider. The image will then change to black and white: the more the areas turn towards white, the more they are affected by the sharpness setting. Take care to have this treatment only on the stars, and as little as possible on the background of the sky, which would have the consequence of increasing the noise.
Then, in "Noise reduction", play with the luminance as well as the detail to smooth and reduce as much as possible the background noise of the shot. You won't be able to completely eliminate it, that's normal. Depending on your case and your personal tastes, you will have to apply this correction more or less. Another method to combat noise in Lightroom is to apply a slightly negative Sharpen and Clarity with the Brush tool, but the brightest elements will be surrounded by a glowing halo.
Delicate part that can reveal the "population" of stars in your image: do not hesitate to use the 100% zoom to check your processing. Be aware that you should not try to completely eliminate the noise because you will smooth the picture and lose a lot of stars...
Once you have obtained a suitable result, you will need to restore the temperature of the shot (its color). You will observe that in the vast majority of cases, the light pollution from public lighting (with the use of sodium bulbs) projects a yellow light into the sky; so you will very often get raw images with this color. To find a more aesthetic tint, you can control the temperature of the shot in the "Basic settings" section, by passing it to negative values, which will make the shot blue. Don't go too hard, find a balance between cold and warm shades... You can also use Lightroom's eyedropper, but it sometimes offers you a bad white balance from an aesthetic point of view (photographs starting in shades of green for example).
Go in shades of blue without going overboard.
All you have to do is set the right values for exposure, highlights and shadows, whites and blacks, as well as vibrance and saturation.
If you have a lot of light pollution, slightly reduce the exposure, frankly reduce the highlights and the whites. On the contrary, if your shot was rather spared, increase the highlights and whites to make the stars brighter and reduce the shadows and blacks to darken the background (watch out for excess to avoid bringing out the vignetting).
For vibrance and color saturation, modulate the intensity as desired, according to your personal taste.
Know how to highlight interesting areas and darken the background of the sky; the adjustments of the shot being developed on this screenshot are visible on the enlargement of the Lightroom panel.
Your image is now complete with this processing. Know that this method is certainly neither the best nor the most complete (far from it!) but it will allow you to take out pretty shots without pulling too much hair.
What about shooting stars?
Shooting stars are very small grains of dust that come into contact with the Earth's atmosphere, heat up enormously and burn, emitting intense light before disappearing. Predicting each shooting star is impossible, however there are favorable periods when their hourly rate is higher than usual; better, it is possible to know the overall origin of their entry into the atmosphere, so as not to look in the wrong direction... I advise you to take a look at this Wikipedia page which explains the different interesting periods as well as the concept of radiant.
Regarding the photo part, there is no magic formula! You just have to maximize your chances of capturing one. For this, the camera must have a fairly long exposure time (30 s for example, be careful not to go too high, you will have stretched stars due to the Earth's rotation) and a lens with a very reduced focal length, to capture as much of the sky as possible. “You never know, on a misunderstanding, it can work”, would say an illustrious interpreter of Star of the snows…
To learn more
Before ending this article, here are some additional ways to deepen the subject.
If you are interested in Nightscape, I advise you to see the work of two Spaniards and two Americans:
Laurent Laveder, author of several books including Pluie d'étoiles en Bretagne, a collection of many shots of the sky with the Breton coasts;
Luc Perrot, living in Réunion (no light pollution), who recently won the international competition organized by TWAN (The World At Night);
Michael Shainblum, known for making very poetic shots of the Milky Way with terrestrial elements;
Lincoln Harrison, who published a very impressive series of "startrails", these shots where you see a swirl of lines of stars in the sky thanks to several hundred shots merged together.
For the most motivated among you, this year sees the creation of the Photo Nightscape Awards, an international competition dedicated to Nightscape; you have until August 31 to post your application and your pictures: don't delay!
I hope I have given you the desire to photograph the sky, and know that there is a lot to learn about all aspects of astrophotography: it is a really vast and fascinating field. Move around, vary the places, don't stay on a failed session, be curious, be methodical, test and retest again until you get images that will make your loved ones' eyes shine!


