


Taking quality photographs at home and with a minimum of equipment remains accessible for a large number of photographers. Find out how to make good use of natural light to highlight the objects photographed.
We are going to cover the main lines to follow to get started in the photography of products, still life or indoor objects and with natural light, in order to avoid the use of expensive or too expert equipment. In summary: how to make quality images easily from home.
We will focus on so-called lifestyle photos, since other disciplines such as food photography or product photography on a plain background deserve a dedicated article. That being said, many of our tips remain valid in most disciplines, just as they remain valid for smartphone photos.
Which camera to choose?
In the case of a paper print – or a strong crop – you have to take into account the number of pixels of the device.
For a webcast only, the definition of the sensor is rarely a limit. To cite just a few examples, a device such as the OM-D E-M10 Mark IV from Olympus, the Lumix GX80 from Panasonic or the Z50 from Nikon offers more than sufficient qualities. This is also the case for all the references in our buying guide for the best hybrid.
Panasonic Lumix GX80 Introductory price €799
-
 reBuy
317,99
reBuy
317,99
-
 Asgoodasnew.com 349,00
-
 Fnac.com Marketplace occasion
380,41
Fnac.com Marketplace occasion
380,41
-
 Amazon
399,00
Amazon
399,00
-
 eBay
472,16
eBay
472,16
-
 Amazon Marketplace occasion
475,99
Amazon Marketplace occasion
475,99
-
 Darty Marketplace 541,98
-
 Fnac.com marketplace
542,98
Fnac.com marketplace
542,98
-
 Digixo 601,99
-
 Cdiscount Marketplace 701,99
-
 Amazon Marketplace
1 077,26
Amazon Marketplace
1 077,26
- All
- Bare case
- Kit 16-50 mm
- All
- Bare case
- Kit 16-50 mm
-
reBuy
653,99
-
Amazon Marketplace occasion
688,99
-
 Rakuten
741,92
Rakuten
741,92
-
Fnac.com Marketplace occasion
760,00
-
 Amazon Warehouse
781,96
Amazon Warehouse
781,96
-
Fnac.com marketplace
795,99
-
 Fnac.com 799,99
-
Darty Marketplace 799,99
-
eBay
814,07
-
Amazon Marketplace
855,00
-
Amazon
899,00
-
Cdiscount Marketplace 899,00
-
Digixo 901,99
-
 The Redoubt 908,90
-
 Phox
1 005,89
Phox
1 005,89
-
 Digit-photo.com
1 049,00
Digit-photo.com
1 049,00
-
 Miss Digital 1
-
 Cdiscount 1
-
 Boulanger.com 1
-
 LDLC
1 108,89
LDLC
1 108,89
-
 Darty.com 1 149,00
-
eBay
899,00
-
reBuy
653,99
-
Amazon Marketplace occasion
688,99
-
Rakuten
741,92
-
Fnac.com Marketplace occasion
760,00
-
Fnac.com marketplace
795,99
-
Fnac.com 799,99
-
Darty Marketplace 799,99
-
eBay
814,07
-
Amazon Marketplace
855,00
-
Amazon
899,00
-
Cdiscount Marketplace 899,00
-
Digixo 901,99
-
The Redoubt 908,90
-
Phox
1 005,89
-
eBay
899,00
-
Amazon Warehouse
781,96
-
Rakuten
902,00
-
Fnac.com marketplace
917,99
-
Amazon
1 049,00
-
Amazon Marketplace
1 049,00
-
Digit-photo.com
1 049,00
-
Cdiscount Marketplace 1
-
Miss Digital 1
-
Digixo 1 051,99
-
Cdiscount 1
-
Phox
1 070,95
-
Boulanger.com 1
-
LDLC
1 108,89
-
Darty.com 1 149,00
-
Fnac.com 1 449,00
-
eBay
1 049,00
In this article, we have taken the images using very high-end hybrids, such as the EOS R5 from Canon or the GFX 100 from Fujifilm. These are particular cameras that we use in our tests, but we also regularly use a first-generation OM-D E-M5 released in 2012 or a Canon EOS 5D DSLR with a 12,8 megapixel sensor. It was presented in 2005, more than 15 years ago. In short, the question of the material is not a problem.
to read also: 11
Our test scene as you've never seen it before! 400 megapixel photos with the Fujifilm GFX 100
Fujifilm's GFX 100 medium format mirrorless has been updated with a new pixel shift function to record 400MP images...
11 months agoWhat objective?
If the type of body is not necessarily crucial, the choice of lens is much more important. The lenses delivered as a kit are often quite average and are positioned as all-purpose "stones". This is why we recommend changing it, as far as possible.
It is better to move towards a rather standard fixed focal length. We think of a lens whose focal length approaches 50 mm, which makes it possible to avoid the perspective distortions of wide-angle lenses. A small telephoto lens is also possible, but the distance needed to capture the entire subject is often limited indoors.
Canon RF 50mm F1.8 STM
-
Amazon Marketplace
226,85
-
Boulanger.com 229,00
-
Rakuten
229,00
-
Digit-photo.com
229,00
-
Miss Digital 229,90
-
Fnac.com 229,99
-
Darty.com 229,99
-
Fnac.com marketplace
229,99
-
 Canon
229,99
Canon
229,99
-
Digixo 231,99
-
LDLC
237,89
-
The Redoubt 238,90
-
Cdiscount Marketplace 241,90
-
eBay
267,82
-
Amazon Warehouse
138,14
-
reBuy
150,99
-
Amazon Marketplace occasion
161,99
-
Rakuten
165,99
-
Amazon
169,94
-
Fnac.com marketplace
169,99
-
 Materiel.net 175,89
-
LDLC
177,89
-
Boulanger.com 189,99
-
Digit-photo.com
189,99
-
The Redoubt 189,99
-
Amazon Marketplace
197,68
-
Miss Digital 199,90
-
Fnac.com 199,99
-
Darty.com 199,99
-
Digixo 201,99
-
Phox
204,90
-
Cdiscount Marketplace 208,89
-
eBay
221,35
It will be necessary to favor a large aperture – generally f / 2,8 or higher in 24×36 equivalent – to better capture the light. In this way, it is possible to reduce the rise in sensitivity which degrades the image. On the other hand, a large aperture generates more background blur (bokeh) and can easily improve the photo. Not only does bokeh add character to the image, but it can also reduce the visual impact of a not always photogenic interior now drowned in blur.
What accessories?
Colored backgrounds, lightboxes, flashes, LED lighting, diffusers and other reflectors are all very useful accessories for creating characterful images. But here we are looking to reduce the financial investment and we will try to meet the challenge by using only a camera... and all the same a tripod which will greatly simplify our task.
The crime scene. The space is small and does not allow the subject to move away from the background or to take a step back with the camera. It is recommended to use a large aperture. © Guillaume du Mesgnil d'Engente / TechnologiesTips
The tripod overcomes many of the constraints imposed by the lack of light. Once the camera is positioned, it is possible to perform the long exposure necessary to capture enough light. If you don't have a tripod, you will have to make do with the means at hand (a pouf, a sofa edge, a seat, a pile of heavy books...). The framing can be modified using improvised wedges, such as the back of a rounded spoon, an open book to better control the thickness of the support, or a folded fabric. Remember to check the stability of the device. This will avoid a blurry photo, and especially seeing the device fall to the ground and break.
What settings for the right exposure?
The question of settings can make neophytes dizzy. We are going to keep it simple to speak to as many people as possible, but also because photography of inanimate objects is accessible anyway. To achieve this, you must use the manual mode of the device (mode M). This mode makes it easy to control:
- The aperture of the lens diaphragm, which determines the "amount" of light that enters the camera
- Exposure time, which determines how long the sensor is exposed to light
- The sensitivity of the sensor, expressed in ISO and which makes it possible to reduce the exposure time, but which in return degrades the image.
To have fewer settings to make, it is possible to use the aperture priority mode of your camera. Combined with the automatic adjustment of ISO sensitivity, only the opening of the diaphragm and the depth of field are to be taken into account. However, image quality may be degraded or different between shots depending on available light.
Before we get to the nitty-gritty, don't forget to set your device to raw recording — if available on your device. This type of file contains much more information than Jpegs and allows better editing in post-production. We recommend simultaneous Jpeg+raw recording to keep a reference image and a file that can be used directly without additional work.
Staging the product by integrating a human referent is a good idea. Care must be taken against the backlight and also the color of the product. © Guillaume du Mesgnil d'Engente / TechnologiesTips
First sensitivity and aperture, then speed
By default, ISO sensitivity is often adjusted automatically by the camera, even when manual photo mode is selected. A little tour in the menus is often necessary to use the minimum value and maintain the best image quality. This value is usually the closest to 100.
Next, the lens aperture should be set to the widest, i.e. the smallest number (the smaller the number, the wider the aperture). The diaphragm set at f/1,4 lets in more light than at f/2,8. Once the diaphragm is wide open, the background blur is more important and makes it possible to better detach the subject from the background. For aesthetic reasons, it is also possible to close the diaphragm and reveal an interesting background for the composition.
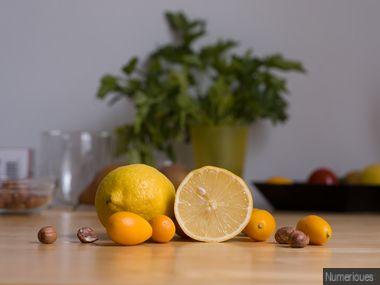
In the previous example, the plain wall is not necessarily interesting, but the cleverly arranged objects will compose a suitable background. We also notice that the framing lacks precision. The corner of the table is visible in the lower left and the horizon leans slightly to the right.
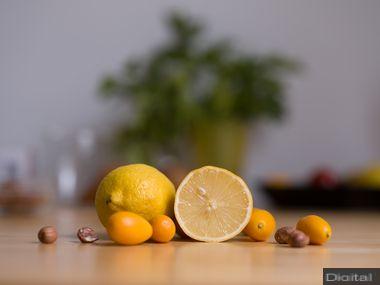
Finally, you have to adjust the speed of your device. This way you will adjust the exposure of the scene. Many tools are available to assist you. For simplicity — but less precision — just take a photo and check how the image looks on the case's screen or on a computer. Depending on the result, increase or decrease the exposure time (shorter if the photo is too bright, longer if the photo is too dark) and repeat the operation until you obtain the desired result.
We cropped and slightly straightened the final image in post-production, in addition to color and exposure processing. © Guillaume du Mesgnil d'Engente / TechnologiesTips
A precise focus
Also be sure to focus on a specific location of the subject photographed, the one you want to highlight. It is better to use a single focus point and move it to the right place. In this sense, hybrid devices are more advantageous and more versatile. When in doubt, the automatic mode is satisfactory in most cases; manual focus is a little more complex, but offers more possibilities and precision.
Of course, the most expert can use the advanced settings available on their device. We recommend enabling the histogram, and even live view of the final render on hybrid devices. The magnifying glass mode is also a valuable ally for achieving precise manual focus, as is the focus peaking which highlights the sharp areas of the image. You can also enable visualization of clogged (too dark) or burnt (too bright) areas to adjust exposure or change lighting.
This Parisian weather is a precious ally. © Guillaume du Mesgnil d'Engente / TechnologiesTips
light management
If the ease of use and the free play in favor of natural light, these are not its only advantages. Its quality and, above all, its variation during the day make it possible to choose the one that will best suit the shooting. Conversely, avoid most artificial lighting found at home. They often spoil the photo and don't always blend well with natural light.
Be careful though, the direct light of a beautiful summer day is sometimes difficult to tame. Pleasant for a small aperitif at the end of the day, it complicates the management of the contrast between the dark areas and the very bright areas of the scene to be photographed. This light also tends to generate excessive shadows, which are generally unsightly. Overcast weather is often preferable. That's good, you just didn't want to go out. A light decorative white veil already present on the window will act as a diffuser. Removing it brings in a bit more light and slightly changes the appearance of shadows.
To achieve a certain harmony, we aligned the objects with the parquet. However, the shadows in the same axis could have been slightly shifted. It will be difficult to get a perfect shot. © Guillaume du Mesgnil d'Engente / TechnologiesTips
The shadows shape the image
Once the workspace has been chosen, in front of a large window for example, you will need to define the orientation and position of the object to be photographed by monitoring two points:
- The light source (the window, for example)
- The drop shadows created by this source
Be careful not to place the interesting part of the object opposite the light source. In the same way, avoid leaving strong shadows in the foreground. The position of the object must be carefully considered. As with adjusting the exposure, experiment to better visualize the consequences of each change.
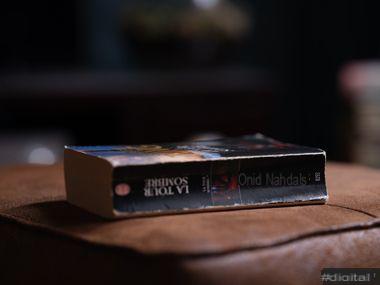
Once you've learned the basics on a simple scene, don't be afraid to push things a little further! On the image above, the background of the image is in shadow. Never mind, we use the flash mode available on our smartphone to slightly lead the shadows on the back. A television remote control is then used as an extra support - and you must not forget to turn the book over to place its title in the right direction.
If possible, use a computer rather than the rear screen of the device. A large screen makes it easier to see mistakes and see areas for improvement. Be critical with your achievement!
It is possible to create "lifestyle" images put into situation. In this case, care must be taken to maintain sufficient speed to avoid camera shake. © Guillaume du Mesgnil d'Engente / TechnologiesTips
The composition should not be left to chance
Don't neglect the background and give it as much attention as the foreground. Composing your image is of course imagining what you include in the photo. However, we must not forget to ask ourselves what should be removed.
Among the general recommendations of photography, we can apply here the rule of thirds which guarantees a certain harmony of perspectives and a dynamic in the image. Beware of the most common errors, such as a leaning photo or an unwanted object that appears in the frame. These are all details that will make your image a successful photograph. And do not hesitate to vary the pleasures (different angles and framing, etc.). This is all the more valid if you are looking to create a photographic series made up of several shots.
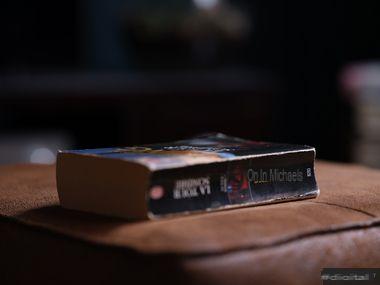
For the final image, we added a small brass watering can and a second book. © Guillaume du Mesgnil d'Engente / TechnologiesTips
everyday objects
To perfect its composition, it is often interesting to bring a little relief to the image thanks to accessories or everyday objects. A book, a mottled lamp in a flea market or a fabric with a beautiful pattern can judiciously bring a little depth to the shot.
Again, doing several tries increases the chances of success. Relying on the first successful attempt is often a mistake; push the good idea even further! And do not hesitate to break this good idea to give free rein to your creativity. It's a good way to progress. Be careful, however, not to go all over the place, at the risk of dispersing yourself and losing sight of your main objective. Whenever possible, tell a small story through the composition, so as to heighten the atmosphere.
We used this photo to illustrate our review of Sony's Alpha 1 (A1) hybrid. © Guillaume du Mesgnil d'Engente
Sorting and editing images
The last step is perhaps the most daunting: make a selection from the photos taken. We won't discuss photo library sorting methods here. To find the right image, take a critical look at your own work and review all the points covered in this article to identify any areas to improve and photos to readjust.
If possible, try not to put the equipment away before this step, it may be necessary to get your hands on it! Letting your mind rest and coming back to your work a little later is also a good way to take a step back.
This black table has an unsightly slit in its center. Removing it only takes a few seconds in Lightroom for a very satisfying result. © Guillaume du Mesgnil d'Engente / TechnologiesTips
Once the image has been chosen, it can be very interesting to go through a post-production stage. This is not mandatory, but it allows you to refine the rendering of the image or to correct certain imperfections. This step is not negligible, and even mandatory for professionals.
Without necessarily falling into major retouching, remove dust, crop the image slightly, adjust the white balance or the exposure; it's easy, fast. Finally, the more adventurous can try to obtain a particular atmosphere thanks to the use of more advanced post-production tools.


