


How to turn photos into PDF on PC
If you want to transform one or more photos into PDF via your PC Windows, what you have to do is consult the next chapters, in which I will explain how to easily reach your goal.
Photo (Windows 10)
PCs with Windows 10 they are equipped with a native instrument, called Gallery: this application allows you to view and make changes to images on your computer and also offers the ability to export images to PDF. How is it his? I'll explain it to you right away.
In case you only want to transform a photo into PDF, you simply need to double-click on it, in order to start the application Gallery. If this does not open and another program starts, right-click on the image to be transformed into PDF and, in the context menu, select the items Open with> Photos.
If you want to generate a PDF that contains multiple photos, open the application instead Gallery through its icon in the menu Home Windows and select the tab Folders. Once this is done, press the button Add a folder and, using the appropriate screen, locate and choose the folder containing the images you want to import into the application. Then click on the folder you just imported, in order to view all your photos and put a check mark on the thumbnails of those you want to convert to PDF.
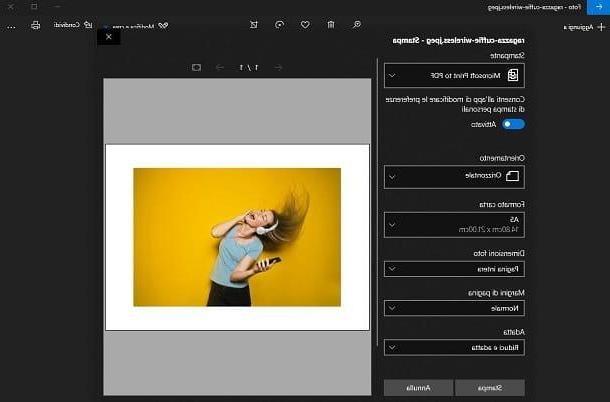
At this point, whether you want to transform a single photo or several photos into PDF, all you have to do is press on theprinter icon found at the top right and select the PDF printer (Microsoft Print to PDF) located in the drop-down menu at the top left.
At this point, adjust the format and orientation setting parameters, using the options on the sidebar and choose the item Shrink and fit, under the heading Suitable, to ensure that the photos are not cropped.
All you have to do is press the button Print and select the folder where the PDF file will be saved. It was easy, wasn't it?
i2pdf
If you don't use Windows 10 and / or you are looking for a third-party software that allows you to transform one or more photos into PDF, I suggest you turn your attention true i2pdf: it is a free program compatible with any version of Windows and that does not require any installation.
To use it, you simply need to reach this link and click on the wording Download i2pdf, choosing from version a 32 bit or that a 64 bit of the program. If you do not know how to recognize the architecture of your PC, I recommend that you consult my guide dedicated to the subject.
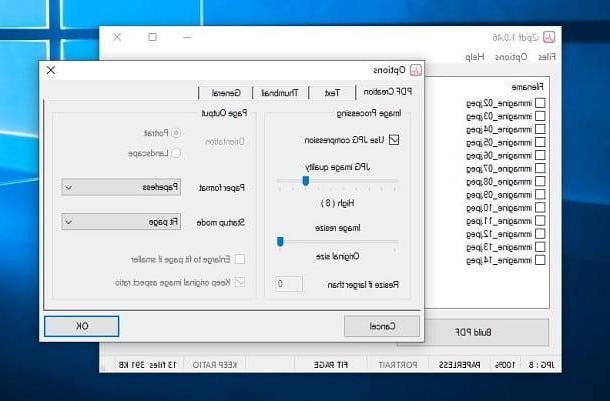
After picking up thearchive .zip of the program, extract the contents to your desktop or another folder of your choice and open the program i2pdf extract. Then, on the main screen of the software, drag the photo or photos you want to transform into PDF and press the button Build PDF, down.
Now you can decide whether to leave the configuration parameters unchanged or to change those you deem necessary, such as image quality, resizing or page format. When you are done, press the button OK and select one destination folder where the PDF file will be saved.
Transform photos into PDF with Word
Means Word, the famous word processor from Microsoft, you can insert images into a document and then export it to PDF.
The first step is to start the software, via its icon on the desktop or in the menu Home Windows, and create a new document by selecting the option New document from its main screen.
Now, insert the images you want to turn into PDF by simply dragging them into the Word window. Alternatively, you can reach the tab Inserisci at the top and press the button Images, to locate the photos to import.
If you have followed to the letter what I indicated in the previous lines, the imported photos will be arranged one under the other, filling the space of the document. If you need to resize them, all you have to do is select them with a click and move the icons placed in the corners, to increase or decrease the aspect ratio. You can also use the tools you find in the tab Size, in high.
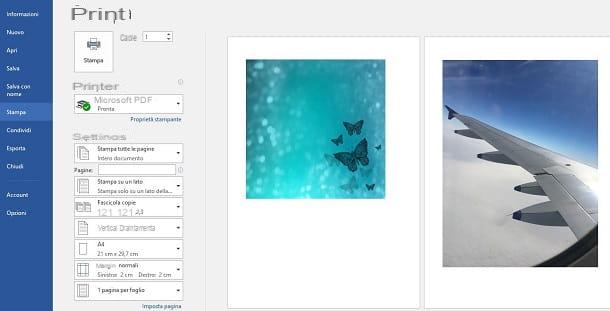
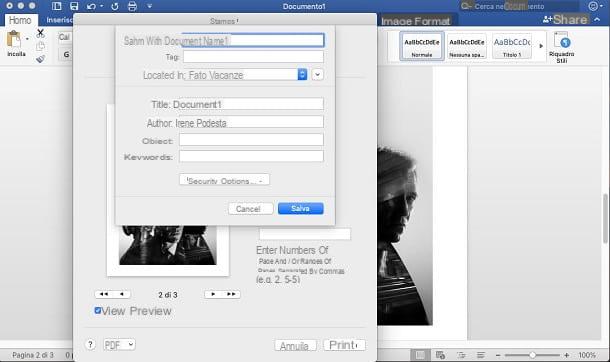
When you have finished your work, to generate the PDF document, move to the tab Fillet located at the top and choose the items Export> Create PDF / XPS Document from the menu that opens, then pressing the key Create PDF / XPS. After that, all you have to do is select the destination folder and click on the button Public, to confirm saving.
If this Word feature isn't available, you can also use a virtual PDF printer, such as doPDF, which I told you about in this guide of mine. Then press on the card Fillet which is at the top and choose the item Print from the menu that opens, taking care to select the virtual printer installed on Windows. Click the button Print and choose the destination folder where to save the PDF file, confirming the operation using the button Save.
How to turn photos to PDF on Mac
If you want turn photos into PDF using a Mac, you will find all the information you need in the next chapters, in which I will tell you about the native macOS solutions and how to use Word to achieve this goal.
Preview
On Mac, there is no need for additional software to create PDFs with photos - you can do it all with Preview, the application for viewing images and PDF files pre-installed on macOS.
The first step you have to take, therefore, is to collect all the images you want to include in your PDF in the same folder, then you have to select them all with the mouse (or by pressing the key combination cmd + a) on your Mac keyboard.
When the operation is complete, open any of the selected photos by double clicking on its icon and it will open automatically Preview, showing you all the thumbnails of the selected images in the sidebar.
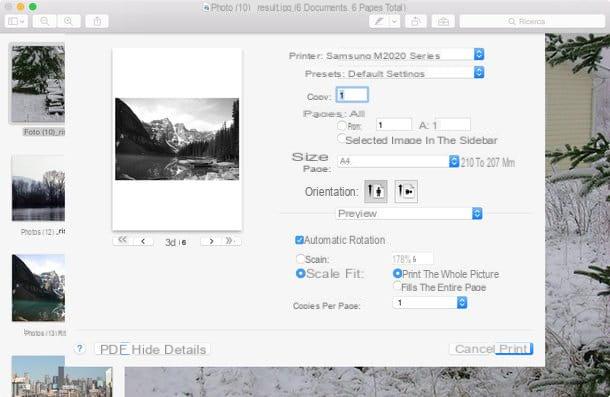
Then arrange the thumbnails in the order you prefer (i.e. in the order you want to be kept in your PDF), using the sidebar, and choose the item Print from the menu Fillet of the program, top left. Choose, therefore, the voice Save as PDF give menu to tendin PDF, located at the bottom left, and select the folder in which to save the final document.
If your photos are present, however, in the application Gallery of macOS, you can't directly turn them into PDF, but you must first export them to a local folder. To do this, start the application Gallery and browse the library Gallery, in the side menu, to locate the images you want to export.
Once this is done, select the photos of your interest by holding down the key cmd on the keyboard and clicking on each of their thumbnails, then select the items File> Export> Export X Photos or the voices File> Export> Export unmodified original of X photos from the menu bar at the top.
To finish, press the button Export, choose the destination folder and confirm the operation by pressing the key Export. Now that the photos have been saved in a folder on the Mac, follow the same procedure that I indicated in the previous paragraphs, to transform them into PDF.
Transform photos into PDF with Word
If you want to use Word to turn your photos into PDF on Mac, the operation you need to follow is very simple. First, start Word using its icon in the Launchpad and create a new document by selecting the option Blank document from the initial screen of the program.
At this point, reach the tab Inserisci, located at the top, and press the button Images. In the box that is shown to you, you can decide whether to import your photos that are in the Photos application (Browser from photos) or those saved in a local folder on the Mac (Image from file).
After you have inserted all the images in the document, you can change their order, by dragging them with the mouse, and modify some parameters, using the tools on the tab Image format, in high.
Finally, to generate the PDF file, click on the items File> Print in the menu bar, at the top, and press the button PDF located at the bottom left, taking care to select the option Save as PDF from the menu that opens. Then you just have to type a name for the file and choose the folder destination, then confirming the saving using the key Save.
How to turn photos to PDF online
If you don't want to waste time installing new programs on your PC or don't want to use native solutions, you can convert photos to PDF using online services usable directly from the browser: here are some of the best.
iLovePDF
iLovePDF is a free web service that allows you to create, edit and convert PDF files with ease. It works on any browser, requires no registration and does not require the use of additional plugins.
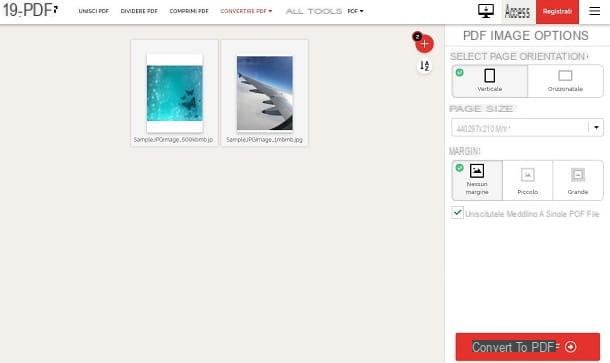
To try it, connect to its home page and drag the images to be transformed into PDF in the browser window. You can also press the key Select JPG images to import photos from your PC folder. You can only select files in JPG and you can upload up to 20 images with a weight of the generated PDF document that cannot exceed 40MB. These limitations can be removed by taking out a subscription at the cost of 6 euro / month.
After selecting the images, choose whether to orient the pages of your PDF in a sense vertical or in the sense horizontal, set them with margin o without margin according to your preferences, via the sidebar. Finally, press the button Convert to PDF, to download the final document to your PC.
How to turn photos to PDF on Android
You have photos on your smartphone or tablet Android and want to convert them to PDF? Nothing easier! You simply have to carefully read the tips that you will find in the next chapters.
Android virtual printer
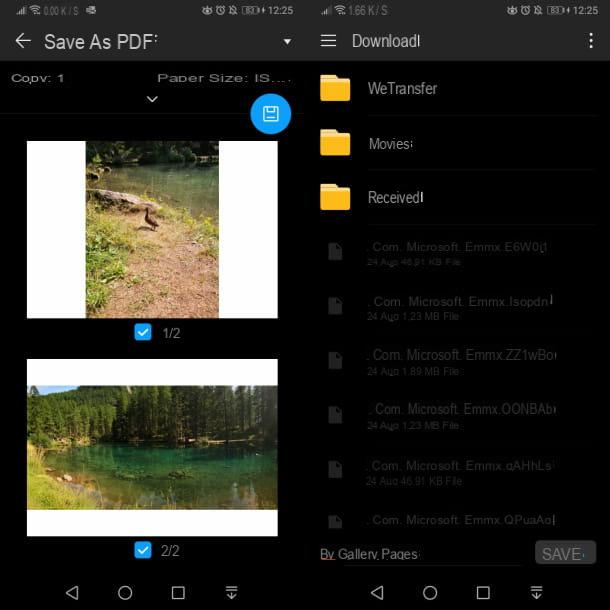
On smartphones and tablets equipped with Android, via the application Gallery (or the application Google Photos), you can generate a PDF file of your photos, using the virtual printer built into the operating system. What you need to do is launch the app you use to manage your photos and select one or more photos from the list.
At this point, tap on the icon (...) and choose the item Print or export to PDF. Using the drop-down menu at the top, choose the option Save as PDF and press thediskette icon (Save). In the new screen that is shown to you, set the path where to save the PDF file and press the button Save, below, to complete the operation.
App to transform photos into PDF on Android
In addition to the native solution I just told you about, on devices Android you can also use third-party apps to turn your photos into PDFs. In the next few lines, I will make you a list of the ones that I can do most for you.
- IMG2PDF - is a free app that generates a PDF file from the images on the device. It is also possible to apply a password to the PDF before its generation, in order to protect it. Although it is a free app, there are banner ads that can be removed by making an in-app purchase for € 4,69.
- PDF Converter - it is a free app very similar to the one I described to you in the previous lines and it is also supported by advertising banners, which can be removed at a cost of 1,49 euros.
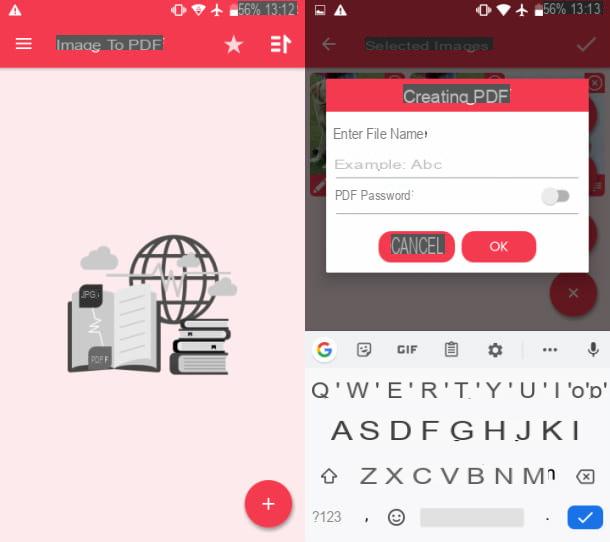
- Image to PDF - as with the previous apps, this free app allows the generation of PDF files from the photos on the device, also allowing you to take them on the spot with the camera. By making an in-app purchase, at a cost of 1,69 euros, it is possible to remove the advertising banners.
How to turn photos to PDF on iPhone
I use a iPhone or iPad? In this case, you can transform your photos into PDF using the solutions that I will propose to you in the next paragraphs.
Virtual printer of iOS
On devices iOS, there is a feature that allows you to generate PDFs from a selection of photos. It is a fairly hidden tool, but you will be able to find it and use it to achieve your goal.
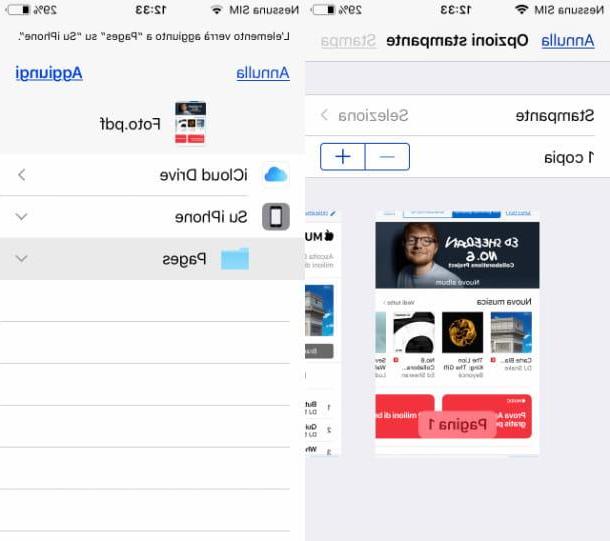
What you need to do is launch the app Gallery and choose the photos you want to convert to PDF. Once this is done, press the share button and select the icon Print from the box that is shown to you. At this point, double tap on the preview or enlarge it, so that a PDF file with your photos is automatically generated.
Now you just have to save the document using the share button: after tapping on it, press the icon Save your File and choose the path where to save the file, in the iPhone or iPad memory or on iCloud. It was easier than you thought, wasn't it?
App to convert photos to PDF on iPhone

If the native functionality of iOS should not satisfy you, you can use some third-party applications, which I will talk about in the next lines.
- Alto PDF: convert JPG to PDF - is a free app that allows you to convert JPG photos on your device, Google Drive, Dropbox or OneDrive to PDF.
- Photo PDF - is a free app that allows you to generate a PDF file from the photo on the iOS roll. It has additional features, such as layouts and PDF quality adjustments, which can be enabled by paying a one-time subscription of 39,99 euros or by subscription starting from 9,99 euros / month.
- Photos to PDF Image converter - is another free app that allows you to take photos in real time or import them from the roll to generate a PDF document. Through the Pro version, at a cost of € 5,49, it is possible to improve the quality of PDFs or organize the generated files in folders.


