


Presentation
The principle is very simple: choose an image, print it. Peel off the image from the support, place it on the textile, iron and here is the t-shirt of your dreams, created in about a quarter of an hour.
For T-shirts in light to dark tones, and even black
10 euros for 6 sheets: paper for dark fabrics is more expensive than that for light ones (10 euros = 10 sheets in this case). It is however this one that very often, you will have to choose: by ''light fabrics'' understand ''white''. Otherwise, all contrast is lost, the white being made up of the color of the support. If the tee is pale pink, what should be white in the picture will be pale pink. In short, as soon as you get out of the white t-shirt, you have to opt for transfers for dark fabrics.
Not our style to recommend reading the instructions but there, unlike televisions, cameras, you have to stick to it. At the risk of making mistakes. The first to avoid is printing an inverted image. Contrary to the methods taught by our grandmothers, here, we iron directly on the image and not on its recto-verso. It's more of a t-shirt sticker than a real transfer.
Start by... washing the t-shirt, then print.
The little trick, not indicated in the instructions, but which we firmly believe: do not put the pattern on a new t-shirt. Wash it at least once, to remove all the products it contains and which will disturb the fixation of the pattern.
When printed, the width of the paper (approx. 20 cm) is sufficient for a child. For an adult, you can use the paper in landscape mode.
Micro Application offers software to download from its site: it is heavy (200 MB), requires registration (grrr) but it turns out to be very practical in the end. You must select the type of paper used (in the Creative hobbies folder), validate, then click on the camera, then on Personal images.
You can then choose your images, one by one or several at once. Select them, move them to the sheet. They then all open up to each other. You can easily move them, resize them from a corner. Practical: the size in cm is displayed on the edges of the image.
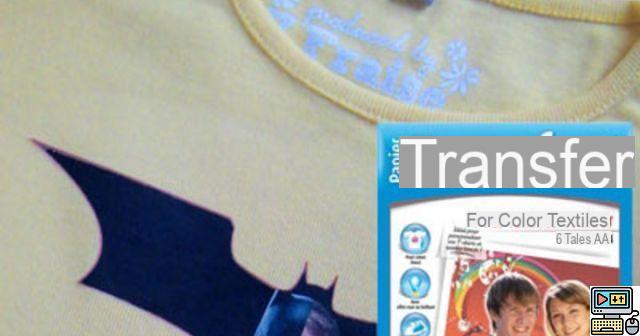
Once the pattern is printed, cut it out, minimizing the borders around it. To make your life easier, if the pattern is complicated, print it on a background. For example, for the Batman logo below, on our second try we printed it on a red oval background. It was easier to cut than all those very fine little details.
| * | |
-
| *
-
|
Then separate the image from the support. Position the image where you want it.
| thead | thead |
| --- | --- |
| *
-
| *
-
|
Cover it with the special sheet delivered (sheet that you can replace with baking paper the following times). Iron each area for the first time, pressing firmly for approx. 30 seconds.
For a matte finish, remove the protective sheet immediately. For a shiny effect, wait two minutes.
Wait five minutes, then start the ironing operation again, for the finishing touches, to fix everything well. And it's done
Precautions after printing
The T-shirt must be washed inside out, not too hot (40° maximum, in ''fragile colours''). He must absolutely avoid the dryer box. The manual specifies that frequent washing should be avoided. We tell you bluntly: it's complicated with children, because of course, you have just created their favorite T-shirt (of the moment).
Highlights
Good resistance to washing... if we follow the recommendations
You can print images as complex as you want
Quick to do
Full instructions: read it! The proposed software is also practical
The gradients are well rendered (if the printer is good)
Weak points
The contrast could be even stronger in the images, with a deeper black
Image is difficult to peel off
Visual confirmation is missing to indicate that ironing should be stopped
Very fine details, such as spikes, can be difficult to fix
Conclusion
Note globale
Once you've tasted these personalized T-shirts for 3 francs 6 cents, it's hard to go back to the overpriced T-shirts, with frozen images that everyone else already has.
Read more


