


Some PCs are now sold without an operating system. However, installing Windows 10 on it is easy if you follow this complete tutorial. A manipulation which will also be valid in the event of reinstallation of the OS.
While the majority of computers are sold with Windows 10 installed by default, it is no longer rare that they are delivered bare, without an operating system. A maneuver that allows manufacturers to lower the price of their PCs. These computers - often laptops - can put off those for whom installing Windows is far from instinctive. However, handling is rather simple, as shown in this tutorial, which can also be used by those who wish to reinstall Windows 10 after a crash or when changing SSD / hard drive. We also take the opportunity to present how to avoid creating a Microsoft account and how to limit the sending of personal data to the servers of the publisher of Windows 10.
Create installation media
To install Windows 10, the first step is to create installation media. Now, the installation DVDs are forgotten, and everything is done using a Windows installation USB key. A support that should be set up from a computer already running Windows, a very simple operation that we describe in another tutorial.
to read also: 14
Tutorial - How to create a Windows 10 installation USB key
For some time now, the installation of Windows 10 can go through a USB key. Its creation is accessible to everyone and, above all, ...
2 years agoWindows 10 installation
1. Boot from the USB stick
Once the USB drive is created, the first step is to start the computer on it. In the majority of cases - especially if no operating system is present - the PCs will automatically find the USB installation medium. Otherwise, you will have to go through the BIOS / UEFI of the computer by pressing the F2, F5 or Del key (most of the time) when starting the computer. Once the interface is visible, you have to go to the Boot or Boot menu to select the bootable media, your USB key in this case. We will then exit BIOS / UEFI by pressing F10 (most of the time) or by going to the Save & Exit menu.
2. Choice of the installation language
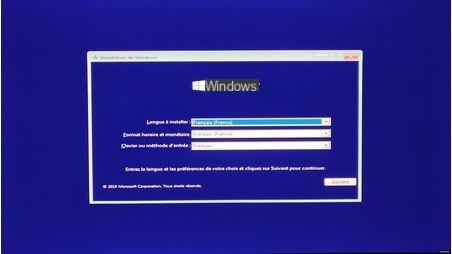


Install Windows 10 - Step 2 - Choose the installation language
The second step is to choose the installation language of Windows 10 as well as the layout of your keyboard. We have selected Spanish in our example. We go to the next step by clicking on Next, then on Install now.
3. Activation and choice of version of Windows 10
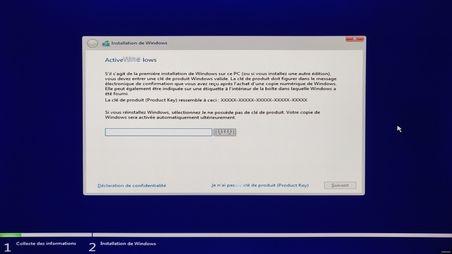


Install Windows 10 - Step 3 - Activate and choose the version of Windows 10
The installation process then asks you to enter your Windows 10 license key. Don't panic if you don't have one - or don't have the code under your belt - it is quite possible to continue with the installation. without a serial number by clicking on I don't have a Product Key. In this case, you should select the version of Windows 10 you want to install. If you are not sure what your license is, select Windows 10 Home. It will always be possible to switch to the Professional version after the fact, the reverse is not easily achievable. By doing so, Windows 10 will be installed and active for 15 days, then it will only be usable by entering a valid key. It remains to accept the terms of the user agreement, then click on Next.
4. Choice of installation destination: SSD or hard drive
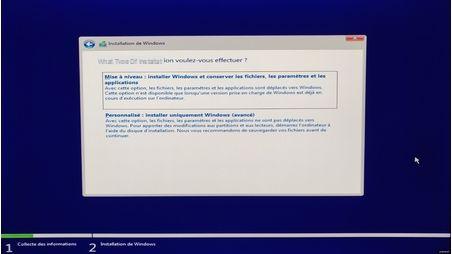


Install Windows 10 - Step 4 - Choose the installation destination: SSD or hard drive
A dialog will then prompt you to choose between a Windows upgrade or a custom installation. The first option is only valid if a copy of Windows is already present on the computer (version 7 or higher). To perform a clean installation of Windows on a computer without an operating system, this is the second option that must be validated. The next step is to select the location where Windows 10 will be installed: an SSD or a hard drive. If the computer is blank, there is no risk, we will select the first storage medium from the list (or the SSD if the PC has both an SSD and a hard drive), it must be named Drive 0. We validate by simply clicking Next, after which the Windows 10 files are installed from the USB key to the computer. At the end of the operation, a countdown appears. You can then unplug your USB key. The computer will then restart and start Windows 10 setup.
5. Choice of language for Windows 10
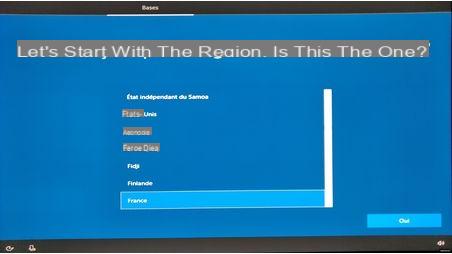


Install Windows 10 - Step 5 - Choose the language for Windows 10
Windows is now installed on your computer, and it is necessary to go through the few configuration steps. It starts with choosing the language - again - and the keyboard layout. Those juggling different types of keyboard will be able to add a second layout (Qwerty, for example). At this point, Cortana - Microsoft's virtual assistant - can take the floor. Clicking on the microphone button, bottom left, mutes it.
6. Internet connection
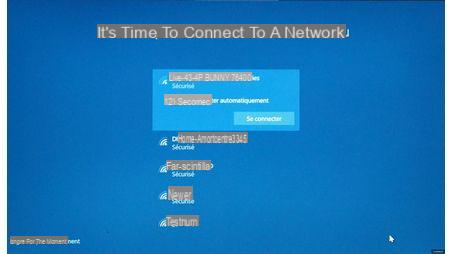


Install Windows 10 - Step 6 - Connect to the Internet
Windows 10 then tries to connect to the Internet. If a network cable is connected, the operation is transparent. In the case of a laptop computer, it detects the presence of the Wi-Fi module and will then propose the list of access points. Select yours (the Wi-Fi of your box or your router), then enter your password, and you are connected to the Internet.
7. Microsoft account or local account, it's your choice
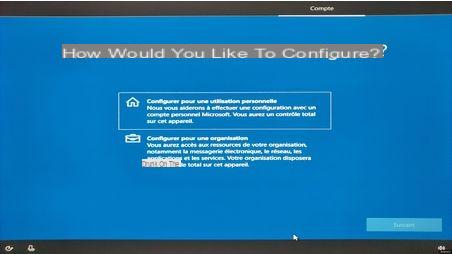


Install Windows 10 - Step 7 - Microsoft account or local account, it's your choice
If you are an individual, you must click on Configure for personal use, the second choice being specific to corporate use. Next, Windows 10 will ask you to sign in with a Microsoft account or create one if you don't already have one. Using a Microsoft account is not compulsory, but allows you to take advantage of the various connected aspects of the operating system: monitoring the location of the PC in the event of loss or theft, synchronization of settings and files between different Windows 10 machines, or access to OneDrive and automatic identification with other Microsoft software (Office, Skype, Xbox, etc.).
Microsoft, however, gives the possibility of using a local account, and thus to avoid the use of Microsoft account. The operation is fairly straightforward, although the setup process will repeatedly try to deter the user. You should first click on Limited experience at the bottom left (note that this is not very explicit), then enter a username (your first or last name, for example). At this point, Microsoft is still hoping to get you to use a Microsoft account by offering the option at the bottom left. However, you must continue by clicking Next to create your local account. The rest of the process is quite simple with the creation of a password, to be entered twice in a row to avoid any typing errors. Three security questions must then be defined so as to be able to unlock the machine in the event of forgetting the password. Different stages during which Microsoft still offers the creation of an online account. Note that Microsoft may also offer to use Windows Hello on machines equipped with a fingerprint reader or a compatible webcam (for unlocking by facial recognition).
8. Activity history

Install Windows 10 - Step 8 - Activity history
At this point, the user can choose whether or not to enable activity history. It is a kind of timeline allowing to quickly resume files or applications used during the last 4 to 30 days (at the user's choice), and this, on all Windows 10 computers using the same Windows 10 account. , the data being stored in the Microsoft cloud. Understandably, activating the activity history requires the creation of a Microsoft account - and this is not the last time that we will try to make you give in.
9. Cortana: Microsoft's virtual assistant
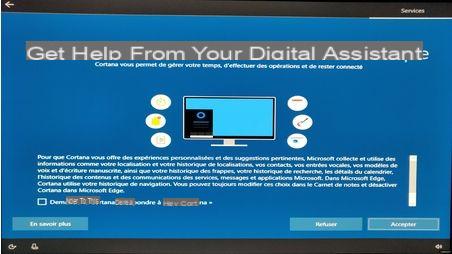


Install Windows 10 - Step 9 - Cortana: Microsoft's virtual assistant
The next step is to configure Cortana, Microsoft's virtual assistant. It is first of all possible to activate the function allowing the assistant to wake up with a "Hey Cortana" by checking the box at the bottom left. Then, you will or will not agree to send most of your personal usage data to Microsoft in order to get refined Cortana results. Everyone is free to make their choice. By clicking on Decline, Microsoft will still offer you to activate online speech recognition so that you can enjoy Cortana by voice (the assistant also works by written suggestions). By using this online voice recognition, the user gives his consent for the voice commands given to be used by Microsoft to improve its service. Clearly, your words will be analyzed by Microsoft's servers. It is also possible to refuse all this by selecting the second option.
10. The location of the device in case of theft or loss
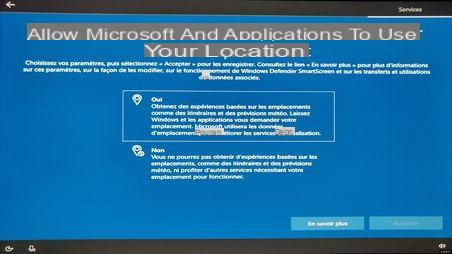


Install Windows 10 - Step 10 - Locate the device in case of theft or loss
The next two steps concern the geolocation of the device used. First of all, it is possible to authorize Microsoft and third-party applications to use the user's geographical location, in particular to benefit from the automatic weather forecast even when traveling, the easier use of the Maps tool for the creation of routes, etc. Again, the user can decline this quite simply by selecting the second option (No). Then comes a fairly interesting function to geolocate and lock your laptop in case of theft or loss. Obviously, it is necessary to create a Microsoft account to take advantage of this functionality.
11. Sending PC data for targeted advertising
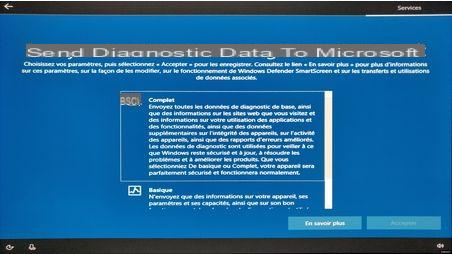


Install Windows 10 - Step 11 - Sending PC data for targeted advertising
The following four steps define the degree of data sent to Microsoft's servers, starting with diagnostic data. By selecting Complete, the user gives Microsoft free rein to retrieve browsing histories, the names of software used, or even error reports for analysis. By choosing Basic, only error reports are sent. We continue with the improvement of handwriting and typing, a step where the user can choose to send their handwriting data (handwritten or typed) to Microsoft so as to benefit from application suggestions and improved writing (valid when using a virtual keyboard). You can refuse by clicking on No. The third step allows you to send its diagnostic data (again…) to Microsoft in order to receive personalized advice or announcements (advertising) when Windows 10 deems it necessary. We refuse this by clicking on No. Finally, those who want to take advantage of personalized (not to say targeted) advertising will click on Yes in the next step, others - like us - will click on No.
12. End of configuration, Windows 10 is ready


Install Windows 10 - Step 12 - End of configuration, Windows 10 is ready
After the last step, Windows 10 performs a final operation for a few seconds or minutes depending on the speed of your computer. After that, Windows 10 will be ready: the user arrives on the desktop, with the Edge browser that launches by default. Last step: choose the language of your choice for the Edge browser. Incomprehensibly enough, it is set to English by default (United States) even though it has already been necessary to choose Spanish twice.
→ More info on installing and activating Windows 10.


