


Do you want to know the steps to install Windows 11 with a USB key, after having launched a reset or after purchasing a new computer that comes without an operating system? Here are the different steps to follow.
Windows 11 has arrived with a lot of new features that involve a slightly different installation from Windows 10. Whether you want to install Windows 11 from a USB flash drive, on a computer you just bought that came with no system, or after a complete reset of your PC, here are the steps to follow.
For these last two cases, you can normally go directly to step 3 - Configure Windows 11
If you just want to update your computer from Windows 10 to Windows 11, then you should follow the following tutorial ...
For a complete tutorial on creating an installation USB key (or bootable USB key) it's here ...

Windows 11 Home
Here it is the brand new version of Windows, it is Windows 11 the evolution of Microsoft's PC operating system. Faster, better display for multiple screens, a new taskbar, new icons, etc.
- Downloads: 638
- Release date: 04/10/2021
- Author: Microsoft
- License: Commercial License
- Categories: Operating system
- Operating System: Windows
1 - Start the PC on an installation USB key
Once you have created an installation USB drive, the first step is to start the computer on it. In the majority of cases - especially if no operating system is present - the PCs will automatically find the USB installation medium.
Otherwise, you will have to go through the BIOS / UEFI of the computer by pressing the F2, F5 or Del key (most of the time) when starting the latter. Once the interface is visible, go to the Boot or Boot menu to select the bootable media (your USB key in this case).
Then exit BIOS / UEFI by pressing F10 (most of the time) or by going to the Save & Exit menu.
2 - Windows 11 installer
2.1 - Choice of languages
Once the PC boots up, the first step is to choose your language preferences.
Click Install Now.
2.2 - License and version of Windows
An Activate Windows window opens and several options are possible: either you have a product key (license) and just have to enter its code, or you do not have one and you must choose I have no product key (so you can activate Windows later). If you reinstall Windows, you must also choose this option, Windows being automatically activated later.
Then select the version of Windows that suits you, Windows Home being the recommended choice for individuals.
Accept the terms of the license agreement and click Next.
2.3 - Choice of installation destination
Then choose Custom: install Windows only (advanced).
When asked “Where do you want to install Windows?”, Several options are possible:
*If your disk is empty, select it and click Next
*If it is not, choose the main drive and click on Format, then Next (be careful, you will lose the data on the drive in question, which should normally not be a problem).
Windows installation starts and you just have to wait for it to finish. You can then unplug your USB key. The computer will then restart and start the Windows 11 configuration.
3 - Configure Windows 11
This is where your PC starts directly if you have initiated a reset of your PC or when you turn on a new computer with Windows preinstalled.
3.2 - Choice of languages
Choose your country…
… Then your keyboard layout…
… And possibly a second provision (practical for translators).
3.3 - Update
If the computer is connected to the Internet, the system will check for updates and, if necessary, install them.
3.4 - Computer name and Microsoft account
Rename your computer as you see fit: Raphael's PC, Daddy's PC, Home office, etc.
The next step requires creating a Microsoft account or, if applicable, signing in with the one you have. This step is mandatory with the Home version of Windows 11. However, there is one trick to dispense with it: unplug your network cable or disconnect from the wifi, then come back to the previous step. You will only be asked to create a profile name and password for local use.
Microsoft then asks to create a Windows Hello PIN in the form of numbers (four is enough) or characters. This is a code that can be used to quickly unlock your machine - it is easier to type a code of a few characters than a password - or to validate the automatic entry of bank details, for example. . Don't worry, if you forget this code, it will be possible to reset it using your Windows account password.
Two choices are then offered: restore the settings related to your Microsoft account or configure the computer as a new user. The first scenario is valid for those who registered their Windows 10 configuration via their Microsoft account. This helps recover the wallpaper, display settings, and even some files if they were synced with OneDrive, Microsoft's cloud storage solution.
3.5 - Collection of personal data
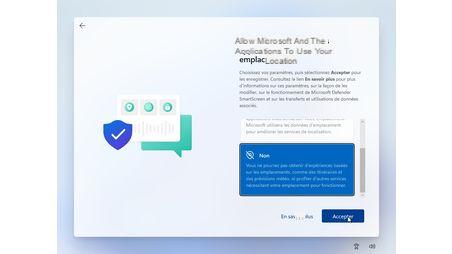


Microsoft then requests a succession of authorizations relating to the collection of personal data. We recommend that you decline everything by choosing No, as this avoids sending all your usage patterns to Microsoft's servers.
You can then customize some options according to your PC usage. For Windows 11, it is about identifying your type of use for software recommendations, giving you tips and, above all, adapting the advertising spaces to your profile. For this, Microsoft will collect personal data; we therefore advise you to Ignore.
3.6 - OneDrive and Office: Microsoft pushes for the use of its services
We continue with the option of whether or not to use OneDrive, Microsoft's cloud file storage and synchronization service, convenient for accessing your files from any other computer. The service is free for the first five gigabytes, which helps to save some important documents. However, this will not be enough to back up your photos and videos. You must then switch to one of the proposed subscriptions to expand the storage capacity in the cloud. Note that it is quite possible to use another type of service (Google One, Amazon, the offer is plethora ...) a posteriori. Those who do not want such a service can click on Don't back up my files and then click Next.
Microsoft is pushing the plug a little further by offering to try Office Premium for free with Microsoft 365 (Word, Excel, Powerpoint, OneNote, Outlook and 1 TB of space in OneDrive). The free trial of the office suite lasts one month (a bank card is then necessary), after which you will have to pay an annual subscription of € 99. You can politely decline by clicking on No thanks.
3.7 - End of installation
Windows finally takes a few minutes to configure.
After these minutes, the Windows 11 desktop is displayed and the computer is ready for use.

Windows 11 Professional
Officially released on October 5, 2021, the new Windows 11 operating system is available in 2 distinct editions: Windows 11 Home and Windows 11 Professional.
- Downloads: 319
- Release date: 04/10/2021
- Author: Microsoft
- License: Commercial License
- Categories: Operating system
- Operating System: Windows


