


Taking a screenshot from a web page or software on Windows and Mac is not necessarily as easy as on the phone. Here's how!
Taking a screenshot is a very useful skill, which unfortunately many do not master. If the simple screenshot can usually be done with a shortcut, capturing an entire web page is much less intuitive. Here's how.
Take a simple screenshot
On macOS
To take a screenshot on Mac, simultaneously press the keys May (⇧), command (⌘), and 3. If you want to capture part of the screen only, you have to press the keys May (⇧) ,command (⌘), and 4. Finally, if you want to create an image from a window, press the key Space after entering the previous combination: May (⇧) + command (⌘) + 4 + espace.
From left to right: screen capture, window capture, window part capture, screen recording, screen part recording. © Apple
On Windows
On Windows, the key combination differs. To capture, press the keys May (⇧), Windows key et S simultaneously. A bar is then displayed at the top of the screen, to select a mode: rectangular, free form, window or full screen. After choosing the type of capture you want, you can select a window, an area or a screen to take the capture.
After selecting the mode using the bar (red box), you can make your capture.
It is then possible to annotate the captured image, once it is saved in the clipboard. To do this, you must access the side menu on the right, and click on the notification of the capture. A window then opens, to annotate, save and share the image.
Annotation and save option from side menu.
If this option does not suit you, you can also use the key print screen to save a screenshot to the clipboard. By adding the key Other, Windows only captures the active window: Other + print screen. However, no notification will be displayed with this key combination: it's up to you to paste the image on Paint or on a document to be able to save it.
Take a scrolling screenshot
If the native screenshot methods are sufficient for basic use, some features are sorely lacking, such as taking a screenshot of an entire web page.
Extensions
Whether on Windows or Mac, most browsers have options and extensions that allow you to save an entire web page — or a large portion — as an image.
Firefox
On Firefox, this option is integrated by default, using the menu Actions for the page (represented by the 3 small dots to the right of the URL). By clicking on this menu, the option "Take a screenshot" allows you to save a portion or the entire page as an image, even if the latter is not displayed entirely on the screen .
Firefox Screenshots lets you take screenshots of the entire page.
For Chrome and Safari browsers, it is necessary to install extensions to be able to do this.
Chrome
On Chrome, the GoFullPage extension allows you to take a screenshot of an entire web page, simply by clicking on the dedicated icon. Once the process is complete, you can download the capture as an image or a pdf.
Safari
On Safari, a similar extension, called BrowseShot, allows you to capture web pages for free. Please note, however, that this extension does not support in-page section scrolling, such as Gmail's mail section.
Software
If the extension concept does not suit you, or if you use a different browser from those mentioned, it is also possible to take these "scrolling screenshots" using specialized software.
MacOS
On macOS, the free Xnip tool allows you to take screenshots
— with or without scrolling — annotate them, and pin them to your desktop. For scrolling captures, unlike an automatic process, you have to scroll the page as you wish. An option that provides additional control over the final capture.
© Xnip
Windows
On Windows, we have selected two software:
- Picpick
- ShareX
Of these two options, Picpick is the easiest to use. Similar to Paint, with additional features, it makes it easy to take scrolling screenshots. Once installed and launched, simultaneously press Ctrl, Other et print screen to take a screenshot. Select the desired window, and PicPick takes care of the rest.
PicPick software interface

Picpick
PicPick is a free screen capture tool with advanced features
- Version : 5.2.1
- Downloads: 2
- Release date: 06/01/2022
- Author : Wiziple
- License: Free license
- Categories: Photo
- Operating System: Windows Portable - XP/Vista/7/8/10/11, Windows XP/Vista/7/8/10/11
ShareX is more complex, but has more features. To take a scrolling screenshot with this software, select "Capture" then "Scroll capture". After selecting the window to capture, adjust the settings as desired — if you're capturing a large web page, increase the maximum number of scrolls — and click "Start capturing".
-
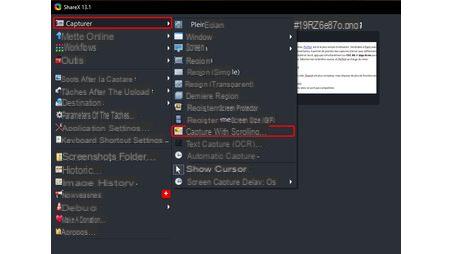
ShareX main menu


The software takes care of combining the different captures to create a coherent image. If the result is not perfect, it is possible to manually adjust the combination of images.

ShareX (ZScreen)
ShareX (formerly Zscreen) is an open source image capture and manipulation application
- Version : 13.7.0
- Downloads: 8
- Release date: 29/12/2021
- Author: ShareX Team
- License: Free Software
- Categories: Office
- Operating System: Windows, Windows Portable - XP/Vista/7/8/10/11
Be careful, if you have PicPick and ShareX installed at the same time on your computer, conflicts may appear, the two software using similar shortcuts.


