


 Comment (5)
What could be better than a good photo to increase your chances of selling your creations or objects and other second-hand clothes? We offer you a guide to obtain a quality result with little means.
E-commerce is accessible to everyone, whether you are a designer who wants to sell their products on Etsy or a private individual looking to sell second-hand items on Le Bon Coin or on eBay. But to achieve this, the presentation of the objects is important, perhaps well beyond the price, since it allows to arouse interest and to inspire confidence and professionalism.
Online commerce for everyone
On the surface, the packshot type photo may seem inaccessible and require expensive equipment. In reality, it is quite possible to approach a professional rendering with everyday objects, an entry-level camera or with a smartphone! If you bow to the practice of "do it yourself" (or "do it yourself" in Spanish), it is even possible to develop your creativity.
It just takes a little preparation. Taking packshot photos at home is within everyone's reach. © Samuel Boivin / TechnologiesTips
We suggest in this tutorial to realize your images without spending fortunes. Although our advice remains valid for the sale of clothing on Vinted or La Reboucle, the presentation of large objects still responds to a few different and specific constraints.
Few means and his smartphone
However, it is quite possible to adapt our recommendations to your needs depending on the type of product (jewelry, clothing, high-tech products, etc.) and your own creative ambitions. Now let's get down to business!
What do i need?
But before we get to the preparation, let's recap the main tools needed:
- A smartphone or a camera to take the photos
- One to three lamps to illuminate the object to be photographed
- A large sheet of paper (A3 or larger size recommended)
- A table and a wall
- Optional, but recommended: a tripod or stand on which to rest the camera or smartphone
The establishment
Preparation
First of all, you have to tidy up the room where the photo session will take place. When taking photos, working in a crowded environment is often a problem. You have to leave room. Pets are also to be banned to avoid dust and hair. An accident like our friends the cats like to cause also happens quickly. Likewise, clean objects of dust and fingerprints. This point should not be overlooked and alleviates a possible post-production phase.
This is what your setup should look like. © Samuel Boivin / TechnologiesTips
The support
To create the background of our image, we have to place a table against a wall. Then we use a large sheet of paper. For the most neutral background possible, the sheet must be white, but it is also possible to use colored sheets. Large format sheets are easily found in stationery or on an online store. Prefer a high weight for better resistance.
Then you have to fix the sheet on the table, which is itself pushed against the wall. Be sure to leave a nice rounding on the join between the wall and the table. So that the leaf does not move; tweezers, tape, or a weight such as a large book can be used.
Of course, our recommendations remain valid without substance. © Samuel Boivin / TechnologiesTips
Artificial lighting
Ideally, for a packshot, you need three light sources:
- The key-light is the main light source. It is placed at 45 ° and illuminates the entire object
- The fill-light is placed opposite the main light. It is a fill light that will blur the shadows generated by the key-light
- Finally, the backlight is placed behind the object to detach it from the background and give it volume or reduce a drop shadow. It is often possible to do without.
Of course all this can be adapted according to your means, the material and the number of lights you have.
Few means are enough to achieve a very good result. © Samuel Boivin / TechnologiesTips
Natural light
If you don't have a workable light source on hand, you can always try shooting in daylight. If this solution is possible, it may be a little less easy to master. Indeed, you have to do with several constraints, such as the location of the photograph, the weather forecast or the time of day. Anyway, we have also devoted a tutorial to this practice. Rather oriented for production with a dedicated camera, the recommendations obviously remain valid for a smartphone.
to read also: 1How to take photos of products without a studio and with a minimum of equipment?
Taking quality photographs at home and with a minimum of equipment remains accessible for a large number of photographers. Deco ...
10 months agoThe reflector and diffuser combo
As soon as a light source is missing, it is possible to compensate for it by the arrangement of a reflector. Placed opposite the light source, the reflector will, as its name suggests, reflect the light and unblock the cast shadows. Conversely, if your key-light is too strong, it can overexpose your photo or create shadows that are too strong. Using a diffuser helps reduce the flow of light.
The shooting
To shoot, we need to use the smartphone or the camera in its manual mode. The latter is often called “pro” on smartphones. The absence of such a mode is not a problem if your installation is rigorous.
Manual mode is your ally
- To showcase the items for sale, avoid wide-angle lenses and opt for a focal length of 50 to 70 mm. For smartphones, it is generally the “telephoto” module which is more suitable, sometimes symbolized by a “2x zoom”.
- To ensure a greater area of sharpness, an aperture of f / 8 or greater should be used. For smartphones, the issue is less problematic due to the small size of their sensors.
- Choosing a low sensitivity makes it possible to avoid degrading the final rendering of its image. An ISO setting of 100 to 800 is generally satisfactory. This point is more critical for smartphones, with which it is necessary to avoid increasing the sensitivity.
- To compensate for the loss of brightness caused by the previous settings, the exposure time should be extended as much as necessary and will depend on your configuration. The risk of blurring is then significant, which makes the use of a tripod or a smartphone holder essential. Using the "self-timer" mode is also recommended. On smartphones, correcting the exposure is sometimes possible by touching the screen.
- Last point that is important: the setting of the white balance - which is not always available. You must choose the value corresponding to your type of lighting. This information is often shared by the bulb manufacturer. In any case, do not hesitate to change the setting of your device or smartphone to get the best result.
For convenience, using an automatic or semi-automatic mode may be sufficient. If your smartphone does not have "pro" or "manual" mode, this will not prevent you from obtaining good results if your installation is well done.
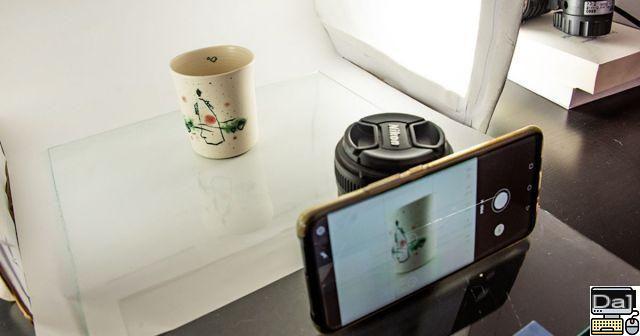
Several tests carried out with different devices, including a smartphone. © Samuel Boivin / TechnologiesTips
Carry out several tests to find the right setting
After a few tries, if the setting is suitable, you can change the position of the object to photograph it from all angles. In this case, be careful not to move or disturb your installation and to reposition the object on the original location.
Photo retouching
If you have cleaned your object well and managed your preparation well, there will be almost nothing to do in retouching. On a photo editing software or application, even basic and free, adjust mainly the exposure and the highlights to avoid a dull image and to find really white whites.
Adjusting shadows compensates for the effects of light sources that are absent or too strong. The contrast gives relief to the image and the saturation revives the colors. Be careful not to have a heavy hand at the risk of obtaining an unattractive and too artificial rendering.
Examples of photos without the background. © Samuel Boivin / TechnologiesTips
Conclusion
Of course, investing in a fully equipped studio or in accessories allows you to obtain excellent, tailor-made results. Despite everything, a simple smartphone or a camera already gives very good results without investing large sums. With a little trick, the means at hand, and especially several tests, making attractive and successful photos for your customers is within everyone's reach.


