


How to increase the VRAM used by your PC to run your games without showing error messages? There are several ways to achieve your goals without needing to purchase a new graphics card. We give you an update in this article on ways to get around the limitations of your PC.

PC gamers are well aware of this concern. Just trying to run a game that is a little too performance-intensive and the computer displays an error message. The problem can find multiple causes, but often it is a lack of VRAM, available in insufficient quantity. VRAM, for "video RAM", is a very specific type of RAM directly connected to your graphics card.
As its name suggests, it is entirely dedicated to image rendering. Concretely, VRAM sends the necessary information to the GPU, such as textures, animations or even light effects, so that it can model them and display them on the screen. As this part of RAM is used "only for that", the GPU can access the data it needs more quickly, significantly speeding up calculations.
On the same topic - How to connect a PS4 controller to a PC
Why increase VRAM?
As seen above, VRAM is used to speed up access to graphics information by the GPU. Not having enough VRAM means, on the one hand, not being able to run certain games requiring significant performance. On the other hand, it means depriving yourself of better resolutions on more recent games. To be able to play in 4K in Assassin's Creed Valhalla, for example, it is necessary to have several GB of VRAM available.
In the event that your GPU does not have enough VRAM, it is possible that your PC simply cannot open some applications. However, if the game is running, it suffices for the latter to be too greedy for the VRAM to be saturated and for the rest of the requirements to be drawn directly from the RAM. In this case, your computer can quickly show some difficulty in functioning properly. The FPS rate, among other things, will suffer greatly.
How to check the amount of dedicated VRAM
You can easily check your PC's performance in terms of VRAM on Windows 10. Here's how:
- Open them Parameters Windows 10
- Select System and Displays and Signage
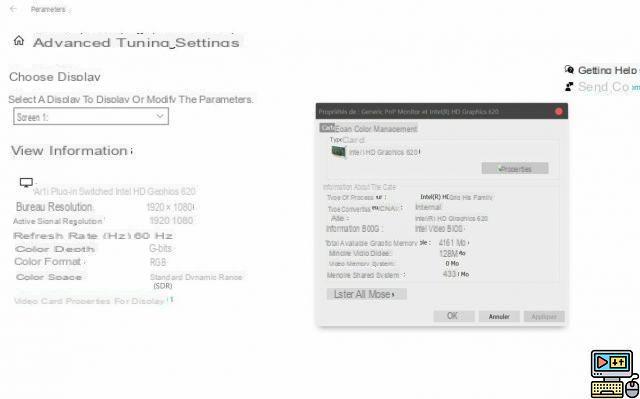
- Click on Advanced display settings
- If necessary, select the desired monitor from the drop-down menu
- Click on Video card properties
This will give you access to all the data relating to your graphics card. You will find the name of it, the type of GPU, the total available memory and, therefore, the amount of dedicated VRAM.
How to increase VRAM with a new graphics card
Let's be honest, the most efficient way to increase the amount of dedicated VRAM is to buy a new graphics card. Some of them offer up to 24 GB of VRAM, like the Geforce RTX 3090 from Nvidia. Suffice to say that you will significantly increase your leeway if you are currently using a GPU integrated into your computer.
However, the solution has some flaws. The most obvious is without a doubt the financial aspect. Graphics cards typically cost several hundred dollars, at least the ones that are really worth the money. In addition, although the option can work on a laptop PC, it is far from ideal, because it is bulky and a bit technical. Fortunately, there are other methods.
How to increase VRAM from BIOS
The first option is to go to the BIOS of Windows 10. Several methods allow this, here is the simplest:
- See you in the Parameters Windows 10
- Select Update and security and Recovery
- In the section Advanced start, click on Restart now
- Then click help, And then Advanced options
- Select Change firmware settings UEFI, And then restart
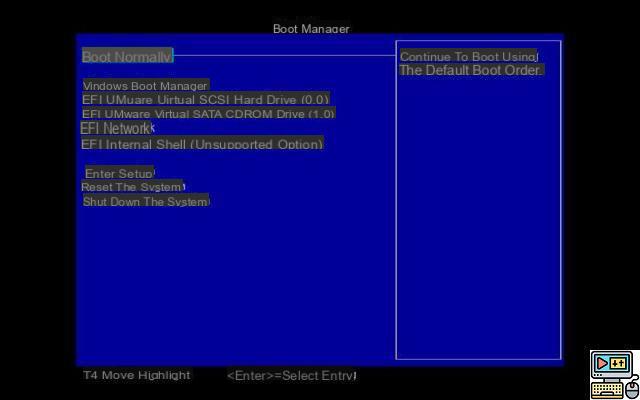
Once entered in the BIOS, you can then modify the amount of VRAM used by your PC. To do so, just follow these steps:
- Search the menu Advanced Features, or with a similar name depending on the version
- Then click Graphic Settings, or VGA Share Memory Size. Again, the names may vary.
- Find the option that allows increase GPU memory.
All you have to do is enter the desired result. For an integrated GPU, you can go from 128 MB to 256 MB in this way, or even 512 MB if your graphics card allows it. Note that not all PCs have this option in the BIOS. If this is your case, you can refer to the following method.
How to Increase VRAM from Registry Editor
Most integrated GPUs, especially in laptops, adjust the amount of VRAM according to immediate needs. Therefore, the numbers displayed in the Video card properties, shown above, are not worth much since they are constantly changing. These are in reality only used to indicate to software a dummy data for those who request it. Starting from this principle, it is possible to modify this data as you see fit from theregistry editor. Here's how to do it:
- Open the menu Start and type regedit
- In the search bar, enter this location: HKEY_LOCAL_MACHINESoftwareIntel
- Right click on the folder IntelAnd click New > Key
- Rename this key GMM
- In the file GMM, right click and select New> 32-bit DWORD value
- Rename the value DedicatedSegmentSize
- Then select Edit after right click
- Assign the desired value between 0 and 512
- restart your computer

It is not certain that this method will prevent you from receiving error messages when launching all games. However, it can be effective in some cases and is therefore worth a try. Let us know if this tutorial has helped you in the comments, or if you know of any other methods to increase VRAM!


