


 Comment (16)
Well known to users of Mac OSX, the operating system of Apple computers, virtual offices offer the possibility of multiplying the work environment. A very practical option now natively integrated into Windows 10. Discovery...
Office multiplication
It's hard to understand why Microsoft has waited so long to offer such a popular option for years among Mac users, but also Linux users. Until now, there was no choice but to use third-party software to be able to install virtual desktops on the different versions of Windows. More attentive than ever to its users, the Redmond firm has finally corrected the situation on Windows 10. The interest of virtual desktops lies in the possibility of creating as many desktops as one wishes and dedicating them, for example, to different tasks: work, music, video games, graphics, photography, etc. The idea is to group together, again for example, software, files and music services on one desktop, those for work on another, and so on. This relieves the main office, and better organizes the environment.
Creation of virtual desktops
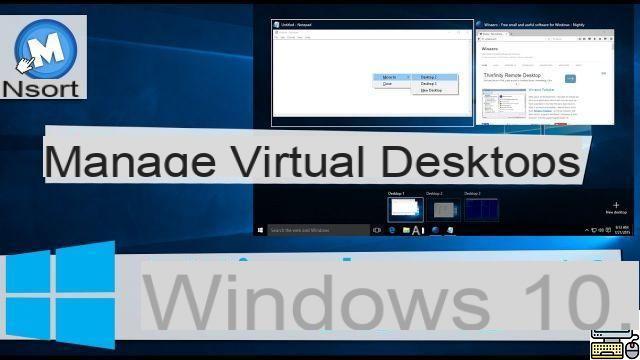
Accessing virtual desktops and creating new ones couldn't be simpler. Just click on the new “task view” button located in the taskbar (the third icon from the left) to open the dedicated control center. Select "+ New desktop" in the bottom right of the window that appears to create a second desktop. Proceed in the same way to create as many as you want. Still by activating the "task view" control panel, you can view a mosaic of programs running on the displayed desktop in the center of the screen. It's very convenient to switch from one office or program to another. By hovering the thumbnails of the virtual desktops at the bottom of the screen with the mouse pointer, you can quickly view the programs open on each of them.
Navigate virtual desktops and programs
Once well organized, virtual desktops save time by avoiding searching for each program in the system menus, for example. It is possible to move an element (application, software, Web browser, explorer window, etc.) running from one virtual desktop to another by right-clicking on it then selecting "Move to : Office 2, or Office 3, etc. in the drop-down menu that appears. Note that you can close an open program or delete a virtual desktop by clicking on the small cross at the top right of their thumbnail. There are various keyboard shortcuts to save time in managing virtual desktops:
Access the virtual desktops menu and running programs: "Windows + TAB"
Create a virtual desktop: "WIN + CTRL + D"
Switch from one virtual desktop to another very easily: "WIN + CTRL + left and right arrows"
In short
Virtual desktops are really practical, but some functions are sorely lacking. We regret for example that Microsoft does not offer any option to customize each desktop with different icons, themes or wallpapers that would better distinguish them from each other. Only the taskbar varies from desktop to desktop showing the different programs running on each one. On the other hand, programs pinned to the taskbar remain displayed on all virtual desktops. Let's bet that Microsoft will eventually decide to enrich this functionality, which remains too basic for some users. Discover our tip below to go much further in the management of virtual offices using the small free software Dexpot.
Tip: go further with Dexpot
Customization has never really been Microsoft's forte. Free for non-commercial use, the Dexpot software not only offers many more options, but it makes it much easier to navigate from one virtual office to another. By default, the program offers 4 desktops, but it is possible to install up to 20 in total. To configure it, just right-click on its icon that appears in the notification bar. For example, by clicking on "Desktop configuration", you can customize each desktop independently: display resolution, wallpaper, modify icons, etc. It is also possible to modify their name and display it or not on the screen. A double-click on the Dexpot icon displays all the desktops created.
In addition to keyboard shortcuts that can be defined for faster access to different functions, a dynamic window displaying thumbnails of virtual desktops allows you to switch from one desktop to another in one click. Via the Dexpot menu, you can also display the "Catalog of windows" to see all the active windows, or "Full screen preview" to display a mosaic of all the desktops. Different transition effects between desktops are offered via the “Settings/Extras” menu, including “Dexcube” which displays a superb 3D cube that rotates on itself. Among the very interesting functions, the “Desktop Configuration” menu offers the possibility of protecting access to one or more virtual desktops with a password. From customization, to ergonomics, through settings options, Dexpot supplants the native virtual desktop function of Windows 10 on all fronts...


