


Index
- Preliminary information
- How to enable file sharing in the router
- How to access the hard disk connected to the router from a PC
- How to access the hard disk connected to the router from smartphones and tablets
- In case of problems
Preliminary information
Before getting into the concrete and explaining yourself how to access the hard disk connected to the router, it is good that you are well aware of some aspects strictly connected to the procedures that I am about to illustrate to you.
First, you need to make sure that the router you own is compatible with network file sharing: the modern routers supplied in combination with the subscriptions of the various telephony operators (such as TIM, Fastweb and Vodafone, for example) include this functionality, which however in most cases must be activated manually.
Additionally, even commercially available mid / high-end routers (such as the Fritz! Box or some routers ASUS, just to name a couple) are equipped with a USB port and have network file sharing capabilities.
Throughout this guide, I will specifically refer to the modem Fastgate by Fastweb: unfortunately I do not have the opportunity to explain the operation of all compatible routers available on the market, but I can tell you right away that you can easily replicate the same steps on many other devices.
How to enable file sharing in the router
The first operation to perform to activate the file sharing function in the router is to connect to the latter's management panel: to do this, start any computer browser and enter the address 192.168.1.1 or, alternatively, the addresses 192.168.0.1 o 192.168.1.254 in the appropriate upper bar. If you do not know the exact address to enter the router in your possession, you can refer to my specific tutorial on the subject or to the user manual of the device you have.
Once the correct address has been entered and the key is pressed Submit, you should see the access screen to the management panel appear: indicate, therefore, in the appropriate boxes, the username and Password to enter the router. If you've never changed your password before, you should be able to log in using combinations admin / admin o admin / password .
In case of problems in completing the login procedure to the router, I invite you to consult my guide on how to access the router, in which I have shown you the simplest methods to obtain the username and password needed to access the control panel. configuration.
Once you have access to the router, plug in the USB disk to one of the ports of the same name available on the back of the device, turn it on and, once back on the computer, look for the items in the management panel File sharing, Network sharing, Server Samba o Disk sharing, based on the type of router you have (usually these are located in the section relating to Advanced settings).
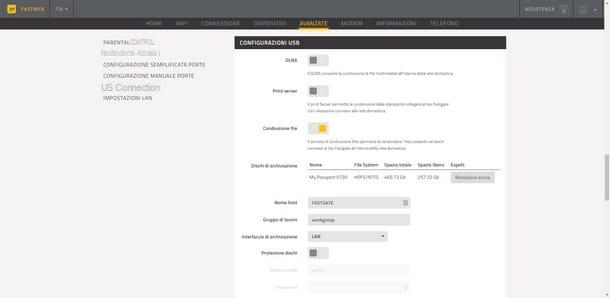
On the Fastgate modem, for example, just access the section Advanced, then click on the item USB configurations and enable the voice File sharing acting on the special lever.
If everything went well, after a few moments, the USB disk should appear among the devices enabled for file sharing: to confirm the activation of the function, scroll the page and click on the item Save Changes.
Generally, you should not perform any further operations in the modem management panel: sharing should work fine without additional intervention. However, if you wish, you can change the name to be assigned to the share, its workgroup and activate the password access system (in this case, you will be asked to provide a username and password to view the shared files ).
How to access the hard disk connected to the router from a PC
Now that your hard drive is shared via the router, it's time to get down to business and see how to access files contained in it. In this section, I will deal specifically with the procedures required by computer operating systems: Windows e MacOS.
Windows
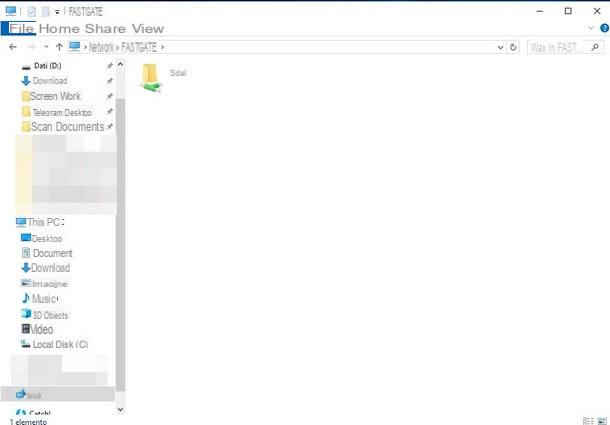
Su Windows, accessing the hard disk connected to the router is extremely simple: all you have to do is open File Explorer / Windows Explorer (using the icon in the shape of gialla poster located in the bottom bar, or by double clicking on the icon PC / Computer question placed on the desktop) and press on the item Network, located in the left sidebar instead.
After a few seconds, you should see your name appear router between the devices connected to the Network: double-click on the latter to access the shared space and, without hesitation, enter the folder which is shown on the screen (identified, for example, by name of the connected disk or by the wording sda1) to gain access to the folders and files stored on the disc.
If, for some reason, the USB disk does not appear in the "Network" section, you can add it manually as follows: double-click the icon PC / Computer question placed on the desktop, click on the tab computer placed at the top and then on the button Map Network Drive.
In the new window that appears, indicate a drive letter to assign to the disk (eg. Z:), specifies whether or not to connect the disk each time you log in to Windows by clicking on the appropriate box and in the field Folder, enter the router's IP address preceded by a double “backslash”, for example 192.168.1.254 and click on the button Browse.
After a few moments, the list of currently connected network devices should appear: expand the entry relating to the IP address of the router, click on the folder bearing the hard disk name (With art. sda1) and, finally, presses the buttons OK e end.
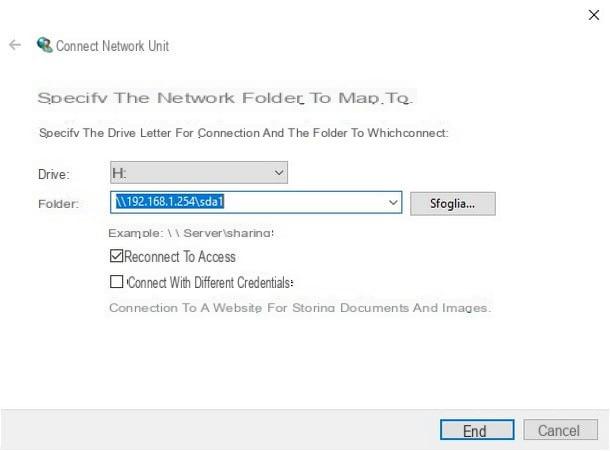
After a few seconds, the disc will be added to the section Devices and units of File Explorer and you will be able to access it exactly as if it were an external drive, connected directly to your computer.
Note: If you have set up password protected sharing, you need to put the check mark next to the box Connect with different credentials in the window for adding a new network drive, and then specify, when requested, the user name and password defined during the router configuration.
MacOS
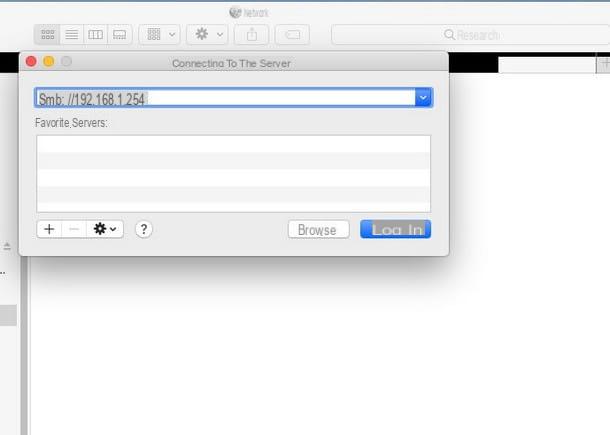
To access the shared disk in the router on the Mac, you need to add it as a network server. To do this, first open the Finder (l'icona a forma di smiling face annessa there Dock bar), click on the menu vai placed high and presses on the voice Connect to the server.
In the next window, indicate theIP address of the router preceded by the string smb: // (With art. smb: //192.168.1.254) e pigia sul pulsating Connect located at the bottom to start the connection phase.
At this point, if you haven't configured password-protected disk access, set the item not ready yet in the username field of the next window; alternatively, indicate in the appropriate fields the username and Password to be used to enter the sharing section of the router.
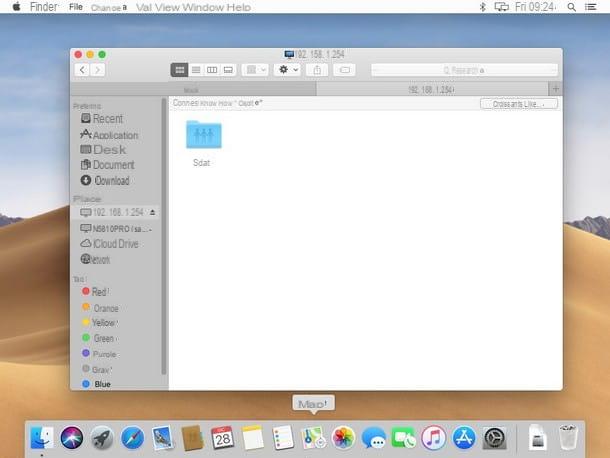
When you are done, click on the item again Connect to add quick access to the router: from now on, you can access the USB disk connected to the router by clicking on theIP address of the same, present in the section Positions in the Finder sidebar, or by clicking the section Network and then on the shared resource. From there, simply enter the folder that bears the name of the disk (eg. sda1) to access the files stored in it.
How to access the hard disk connected to the router from smartphones and tablets
You did not find the above instructions useful, as it is your intention to access the hard drive connected to the router via smartphone e tablet? Don't worry, I'm not going to leave out this aspect: below, in fact, I am going to tell you a couple of useful apps for the purpose, both for the operating system Android that for iOS.
Android
If you have a device with an operating system Android, I recommend you rely on the File Manager + app, an excellent file manager available for free for both smartphones and tablets which, among the many features offered, also includes access to shared network resources. How do you say? Have you never installed an app on Android and you don't know how? Then I advise you to immediately read my guide on how to download Android applications, in which I have provided you with all the necessary instructions.
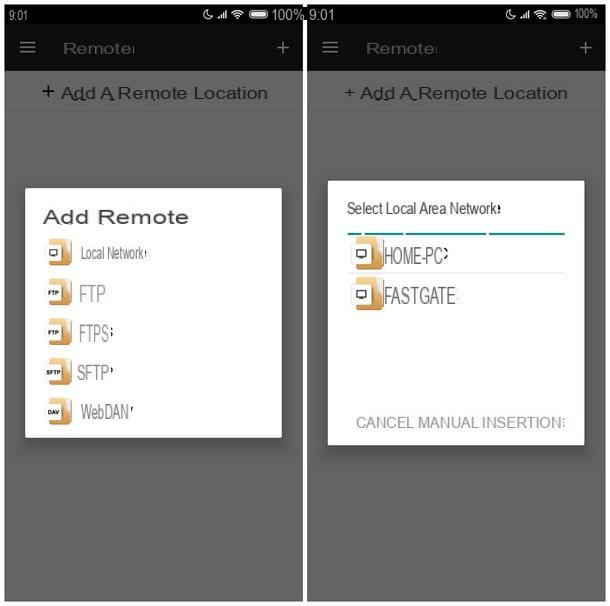
Once you have obtained the app in question, start it from the Android drawer and, when requested, grant it the necessary permissions to access the memory and other parts of the operating system. At this point, make sure you are connected to the Wi-Fi network generated by the router to which the disk of your interest is connected, return to the File Manager + app and tap on the item At a distance to start adding a network resource.
Once this is done, touch your voice Add a remote location (alternatively you can tap on the symbol [+] located at the top right), select the option Local network, then wait a few seconds for the router to be identified and reported in the list of network devices. When this happens, touch the name of the router and then put the check mark on the item Anonymous (or indicate username and password, if you had previously configured secure disk access) and tap the button OK to add the router to the app's network resources.
From now on, you can conveniently access the router (and thus the disk sDA) by starting File Manager +, pressing the icon At a distance and selecting the router added earlier.
Please note: if the disk or router does not appear among the resources that can be added in the app, you can try to proceed with manual entry. To do this, take yourself back to the path At a distance > Add a remote location > Local network and touches on the item Manual entry. Once this is done, enter the IP address of the router in the field Host placed in the next panel, check the box Anonymous to do tap su OK to add the hard drive to the app.
iOS
If, on the other hand, I had a iPhone or iPad, you can rely on the FE File Explorer app, a complete and functional file manager, downloadable directly from the App Store. If you don't know how to install new apps on your iOS device, I suggest you read my guide on how to download apps on iPhone, in which I showed you all the steps required to download applications through the built-in store.
Before even starting the app, check that your Apple device is connected to the Wi-Fi network of the router where the disk is connected and, if not, do it yourself. Once this is done, start FE File Explorer by recalling it from the Home screen of the device, grant the necessary permissions for its operation and, once you reach the main screen, touch the button capacitor positive (+) lead located at the top right.
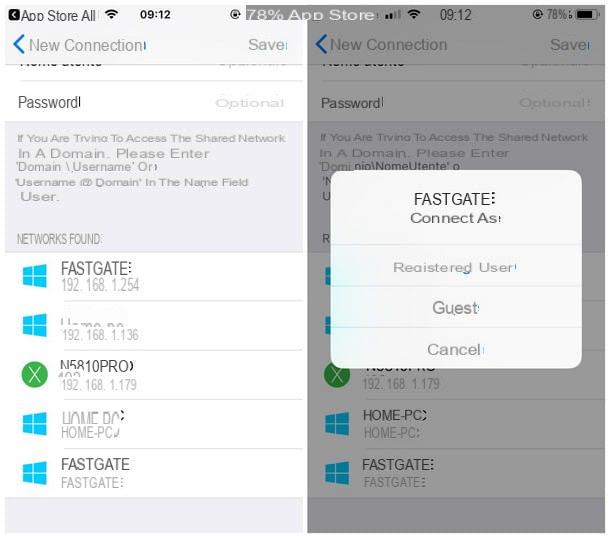
Next, tap on the item Windows, scroll to the next panel until you find available assets, then tap on name router or its own IP address. At this point, press the button not ready yet and wait for the connection between the device and the router to be established: after a few moments, you should be able to access the files on the disk by accessing the appropriate folder (eg. sDA).
If the router or disk does not appear among the network devices, brought back to the device add screen, presses again on the item Windows and, in the field IP address, indicates theIP address router (eg. 192.168.1.254) and specify a name as desired to identify the device. When you're done, press the button Save to add the router to the app's network resources.
In case of problems
Although you have slavishly followed all the steps described in this guide, were you unable to access the disk connected to the router? The causes of this problem could be many: below I indicate the most commonly encountered.
For starters, check out the file system USB disk is formatted with: Some routers are perfectly capable of reading disks formatted in NTFShowever, older modems may only be compatible with file systems FAT32 o exFAT
First of all check on a Windows PC how the hard disk you intend to use on the router is formatted; the latter, if it is recent enough, should support the NTFS file system without problems, but some will only read disks formatted in FAT32 or exFAT. If in doubt, after connecting the disk to the computer and saving (and possibly moved elsewhere) the files contained within it, you can reformat the disk in FAT32 by following the steps I indicated in my guide on how to format external hard drive.
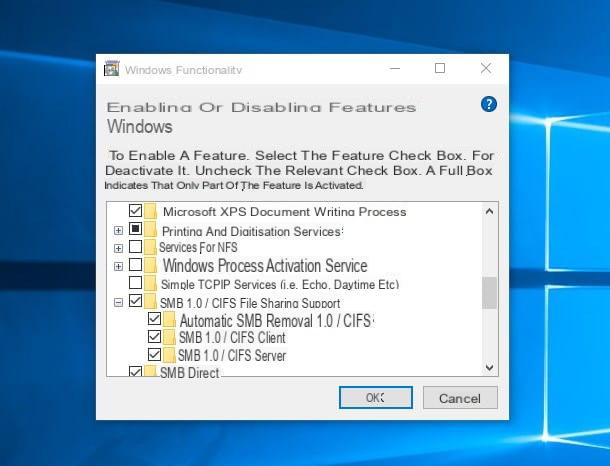
Another problem not to be overlooked is the lack of support for the SMBv1 standard by Windows 10 (removed in the past due to security problems): this lack, in fact, could cause the disk and network shares not being read that use this protocol (used, for example, on numerous TIM router). Since the flaws in this protocol have been fixed, you can activate it manually
You can work around this problem by manually integrating SMBv1 into Windows 10: to do this, click on the menu Home (l'icona a forma di pennant located in the lower left corner), type the words Control Panel in the search field and select the first result returned.
At this point, clicca sulla voce Programs (if you can't find it, make sure the Category view is active by looking at the menu located at the top right) and then select the option Turn Windows features on or off.
Almost there: scroll the list shown on the screen until you find the items SMB 1.0 / CIFS File Sharing Support e SMB Direct, put the check mark next to both (making sure that the sub-categories are also marked with the same sign) and, when you are done, press the button OK to install both protocols. At the end of the procedure, restart your computer and repeat the procedure for adding the network resource, as I indicated in the previous section.
Finally, if the router provided by your operator does not have USB ports or they do not work, you can always buy a new router equipped with these ports and connect the USB disk to it, and then create a "cascade" with the device received. on loan for use with your fixed telephony contract. Does it seem difficult to you? Trust me, it is not at all: you will realize it by reading my tutorial on how to connect two WiFi routers to the same line, in which I have explained to you in detail all the steps to take to connect a new router without giving up the old one.
How to access the hard disk connected to the router


