


Before you begin: Convert your PowerPoint presentation to video
Before getting into the tutorial and finding out how to convert PowerPoint to DVD, you need to do a basic thing: convert your presentation to MPEG-4 video.
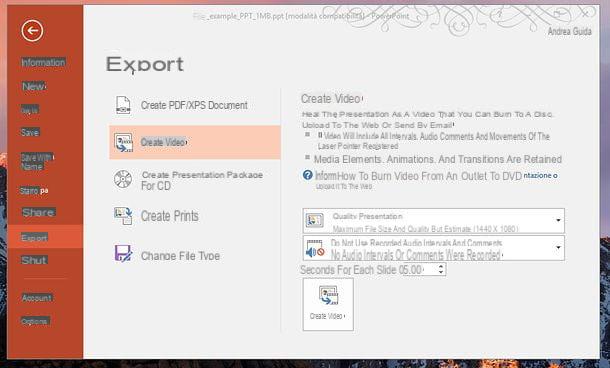
If you use a PC Windows, you can convert PowerPoint presentation to video using PowerPoint itself. The procedure to follow is very simple: open the file PPT o Pptx you want to convert, click the button Fillet located at the top left, select the item Export from the left of the screen and go up Create video.
At this point, choose the option Presentation quality give menu to tendin Presentation quality to set the video to maintain the highest possible quality, use the drop-down menu below to choose whether use recorded intervals and audio commentary in the output video and use the field Seconds for each slide to set the number of seconds that must pass between slides within the output video.
Once you have adjusted all the parameters of the movie to be obtained, click on the button Create video, set the option MPEG4 in the drop-down menu Save eat, choose the name and folder where to save the video and click on the button Save to start exporting. The duration of the process will vary depending on the length of the presentation to be exported and the power of the computer in use (you can follow its progress via the completion bar that appears at the bottom left). If you are told that some multimedia elements of the presentation cannot be included in the video, it means that the PowerPoint file includes audio files or video clips that will not be included in the output video.
If you use a Mac, to take advantage of the function of exporting video presentations within PowerPoint (via the File> Export) you must subscribe to the service Office 365, with prices starting from 7,99 euros / month (after the first month of free trial). For more info on this, read my tutorial on how to download Office.
Alternatively, you can turn to the Online Convert online service, which is free and supports presentations up to 100MB, however it fails to keep all the animations and features of the original presentations. To learn more, read my guide on how to convert PowerPoint presentation to video.
Burn PowerPoint presentations to DVD
Once you have a video with your presentation slides, you can take action and create your own DVD compatible with all computers and living room players. You can proceed in a very simple way and at no cost on both Windows and macOS: find all the details below.
Windows
If you are using a Windows PC, you can create your DVD with DVD Flick: a free and open source DVD Authoring software, through which it is possible to take a video file, transform it into a DVD video compatible movie and burn it all onto a disk (or obtain an ISO image to burn with another software ).
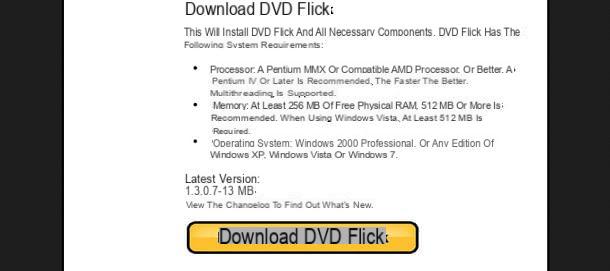
To download DVD Flick, connect to the program's website and click on the item Download present in the menu located at the top. On the web page that opens, click the orange button Download DVD Flick to download the software.
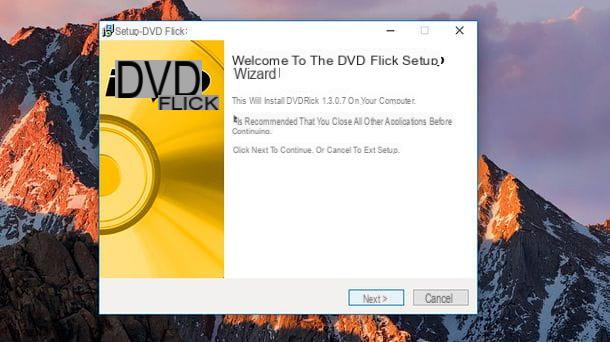
Once the download is complete, double-click the downloaded installation file. In the window that opens, click the button first Yes and then Next. In the following window, check the item I accept the agreement and always click the button Next, Then install and finally, su Next.
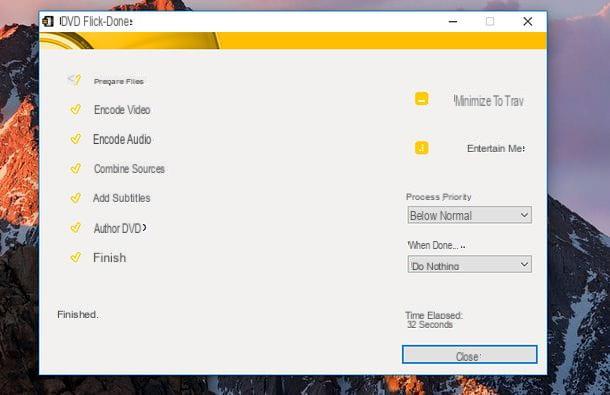
At the end of the installation, check the item Run DVD Flick and click sul pulsating Finish to start DVD Flick. At this point, click on the button first Close and then on the button Project setting: move to the section Burning and check the item Burn project to disc before clicking the button Accept.
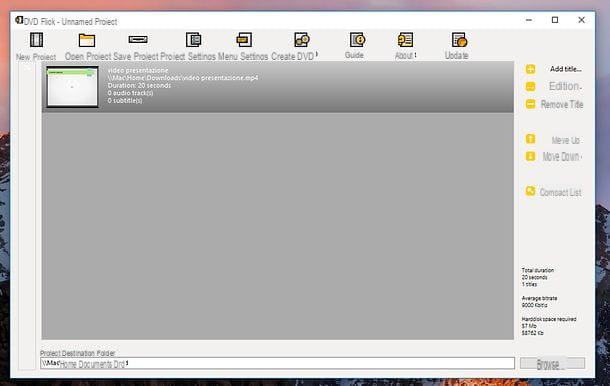
In the DVD Flick main window, click the entry Add title ... present in the right column of the program and, in the window that opens, double-click on the video with the PowerPoint presentation created earlier. Insert a blank DVD into your computer's burner and click the button Create DVDs to burn it all.
A window will open in which you can follow the progress of the video conversion and its burning (which will take place via ImgBurn, well-known free burning software that I told you about in numerous circumstances, such as the one in which I told you how to burn ISO files).
If you want, via the drop-down menu When done located on the right, you can choose whether to turn off the computer (Shut down), restart it (reboot) or whether to switch it to standby (Enter stand by) when the DVD conversion and burning are finished.
Instead of burning the DVD with the slideshow directly from DVD Flick (or rather ImgBurn), do you want to use an external program? No problem, just set the software to generate an ISO image to open in another burning program.
To set DVD Flick to obtain an ISO image, press the button Project setting (top), move to the section Burning and check the item Create ISO image before clicking the button Accept.
You will get an ISO file (whose output path can be selected by clicking on the button KATEGORIEN located at the bottom right) to be fed to your favorite burning software. I have already explained to you how to burn ISO files in my tutorial dedicated to the theme.
MacOS
If you use a Mac, you can convert your MPEG4 file to a DVD video compatible format and burn it to disk using Burn Energy Drink: a free burning software that, unfortunately, has not been updated for some time but seems to work well even on the most recent versions of macOS (I tested it with macOS 10.13 High Sierra).
To download Burn on your Mac, connected to the official website of the program and click on the item Download 64-bit version which is located at the bottom right. Once the download is complete, open the zip package which contains Burn, copy the program to the folder Applications macOS and start the program by right clicking on its icon and selecting the item apri from the context menu (this operation is only necessary at the first start, to bypass macOS restrictions on applications from non-certified developers).
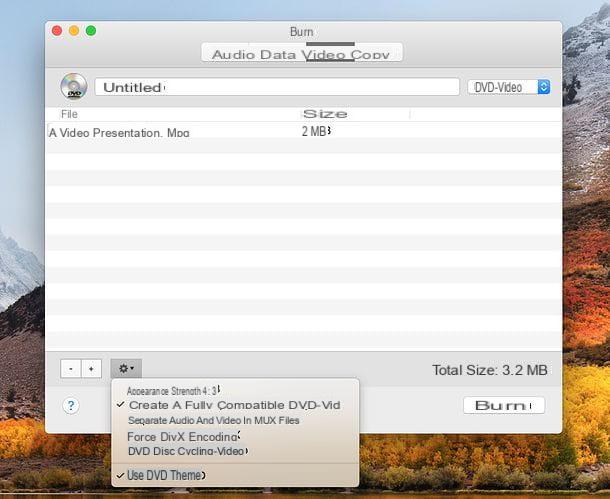
Once Burn has started, go to the tab Video of the program, type the title you want to assign to the disk in the appropriate text field and select the option DVD-Video from the adjacent drop-down menu. At this point, press the button [+] located at the bottom left, select the video of the presentation you want to burn, answer Converted to the warning that appears on the screen and choose the folder in which you want to save the disk files (making sure that in the drop-down menu at the bottom there is selected the option PAL): in this way, Burn will take care of converting the MPEG4 file you have selected into a movie compatible with standard DVD video.
At the end of the conversion (the duration of the process may vary depending on the length of the video to be converted and the power of the computer in use), click on the button Burn which is located at the bottom right of the Burn window, choose the burning speed from the window that opens (I advise you not to exceed 4x) and presses the button Burn to start creating the floppy disk.
If you intend to create a disk that is also compatible with older DVD players, before starting the DVD writing, click on theicona dell'ingranaggio located at the bottom left and put the check mark next to the item Create a fully compatible DVD-vid from the menu that opens. In the same menu, you can also remove the check mark from the item Use DVD theme and disable the creation of a menu for the diskette.
If you have a problem with Burn, you can set the program to create an image file with the video DVD instead of burning the disk directly with it. To save the DVD as an ISO image instead of burning it, after converting the MPEG4 file to the format compatible with DVD video, select the item Save immagine from the menu Fillet (top left) and choose the folder in which to save the ISO file.
Then you can feed the ISO file to any burning software and get your disk compatible with all living room players. If you need more information on how to burn DVD on Mac, check out my guide on it.
How to convert Powerpoint to DVD


