


How to turn a video into a live photo: Android
As you surely already know, “live” photos - or Live Photos - are exclusive to iPhone and iPad and can only be created using the latter devices. A trick for turn a video into a live photo su Android, however, there is: just "extrapolate" the part of the video of your interest and convert it into an animated image of type GIF, using an app dedicated to the purpose. I tell you right away that, unlike Live Photos, GIF animations can last even longer than the classic three seconds but cannot include audio.
Having made this necessary clarification, let me explain how to transform a video into a GIF image: among the many applications available on the Play Store and on the alternative stores for Android, I suggest you give an opportunity to ImgPlay - GIF Maker, a free app that allows you to create an animation starting from a movie, in a couple of taps.
First, therefore, open the reference store of your device, search inside the app ImgPlay using the appropriate field and, when you have found it, tap the button Install, to download it. When the download is complete, start the app by pressing the button apri or by using the icon created on the screen Home of the device (or in the drawer), tap on the item Start and, if requested, grant it the necessary permissions by responding affirmatively to the subsequent notices.
Once you reach the main screen of the app, which should show you all the multimedia elements stored on the device, tap on drop down menu located at the top left (initially bearing the wording Photo in GIF) and select the item Video in GIF from the inside, in order to indicate the will to act on a film.
At this point, ImgPlay should show you all the videos in your Gallery; if you wish, you can also choose a movie resident in a different position, by tapping on the wording Gallery located at the top left and selecting the folder of your interest from the panel that is proposed to you. Also, you have the option to record a video on the spot by tapping the camera symbol located at the top left.
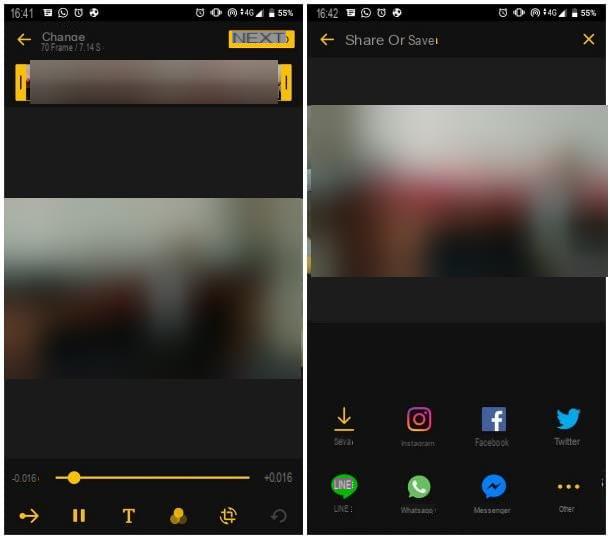
After identifying (or recording) the video to act on, tap its preview and use the editor displayed to apply the changes you deem appropriate: drag i BORDI of the timeline located at the top to select the part of the video to be transformed into GIF and use the buttons located at the bottom, if you wish, to add text (the symbol in the shape of a "T"), filters (the icon of three circles) or to rotate the movie (the crossed corners).
When it was finite, fai tap sul pulsating Following located at the top right and use the resident buttons at the bottom for save the GIF in memory, or share it on social networks or through one of the applications installed on the device. A watermark is applied to the GIFs generated in this way, which can be eliminated by updating ImgPlay to the version PRO, at the cost of 2,19 €.
If you feel that ImgPlay is not for you, you will be pleased to know that the Android stores are teeming with apps to create GIFs, even starting from existing videos: I told you about it in depth in my tutorial dedicated to the topic. .
How to turn a video into a live photo - iPhone
As you certainly know, the Live Photo are a particular shooting mode available on iPhone and iPad, capable of capturing what happens 1,5 seconds before and after the photo is captured, including sounds and animations. Nonetheless, the iOS operating system (as well as iPadOS) does not have a built-in system to quickly convert an existing movie into a live photo, but there are still some third-party apps that can do this.
One of them is intoLive — Create animated wallpapers: it is an application available for free on the App Store, able to quickly transform an existing movie into a Live Photo. However, it should be noted that intoLive offers in-app purchases, at the cost of 2,29€, aimed at unlocking extra features and removing advertising banners.
In any case, to get the application in question, go to the appropriate section of the App Store, tap the buttons Get e Install and, finally, authenticate to your account via Face ID, touch ID o Password Apple ID. At the end of the installation, start intoLive by tapping the button apri or onicon that has been added to the Home screen and / or App Library.
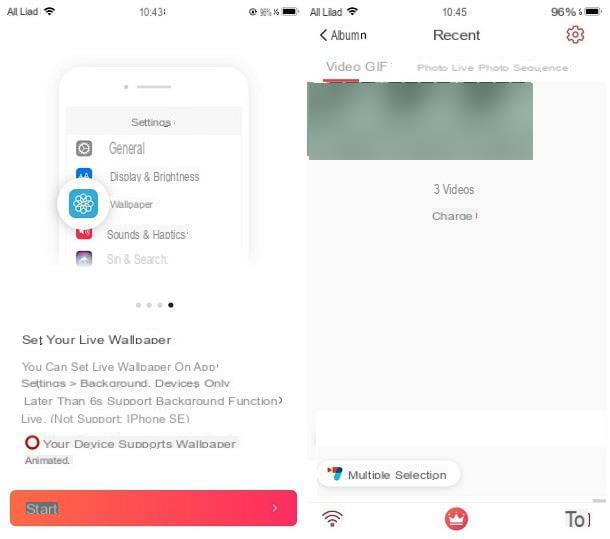
Now, tap the button Following for a few consecutive times to see the first start tutorial, then tap the button Start e allow access to all photos of the Gallery, to ensure that the app can freely access the multimedia contents saved on the device. If prompted, tap the buttons No, see ads that are less relevant e Agree, in order to continue with the free version of the app.
If everything went well, you should now be in the main intoLive screen: select the tab Video placed at the top and tap onpreview of the movie to be transformed into Live Photo; alternatively, if the file is accessible via iTunes file sharing or on the cloud, tap the Wi-Fi cleats located at the bottom left and tap the option of your interest, from the proposed menu, then following the instructions provided on the screen to proceed with importing the video.
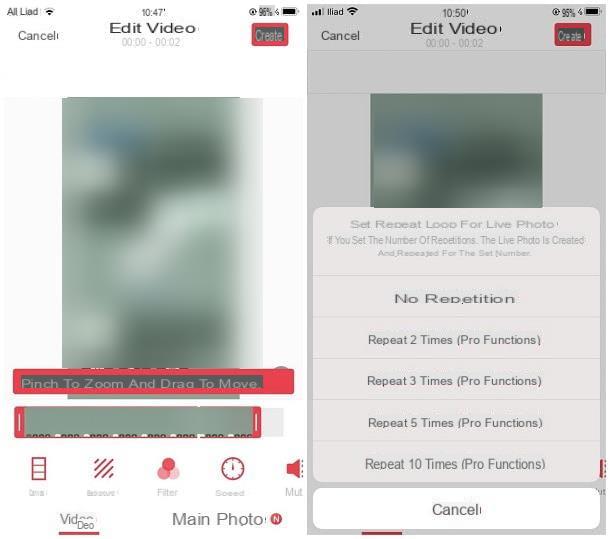
Once you have identified and selected the movie of your interest, use the integrated editor to make any changes and customizations: using the red edges of the time bar, you can define the initial and final part of the Live Photo; to apply watermarks, filters and other graphic effects, use the buttons located a little further down. If you prefer to specify a specific frame to use as Main photo, tap on the option of the same name, located at the bottom right.
Once you've finished making changes, tap the button Crea placed at the top, define the number of repetitions of your interest (the only option available, for the free version, is No repetition) and wait a few moments for the Live Photo to be created. To save it to the iOS Gallery, tap the button Save Live Photo which appears below.
I remind you that the Live Photos thus created, among other things, can be set as an animated background image: to learn more, I refer you to reading my guide on how to set a video as a wallpaper on iPhone.
How to turn a video into a live photo: PC
The speech already seen for Android also applies to PC: Although it is not possible to transform a video into a Live Photo, it is possible to convert an extract from it to an image GIF using specific online programs or services.
Adapter (Windows / macOS)
One of the programs I recommend you try in this regard is Adapter: available for Windows and macOS platforms, it is a free and open source converter that allows you to quickly transform a video from one format to another and, if necessary, convert it into a GIF image.
All clear? OK, let's get started. First, connect to the program's website and click on the button Download Adapter to start downloading the installation package to your computer. Once the download is complete, if you use Windows, launch the .exe file obtained, press the button Yes and choose the language you prefer (eg English) from the drop-down menu that appears later. Then click on the buttons OK e Next, put the check mark next to the item I accept the agreement and click the button Next five consecutive times to authorize the installation of add-ons. If you use a MacInstead, open the .dmg file ottenuto, trascina l'icona di Adapter in the folder Applications And that's it.
Once the installation is complete, start the program by clicking on the icon created on the desktop Windows or in the folder Applications of the Mac (in the latter case, at the first start, you have to press the button immediately afterwards apri and you must accept the installation of the free component FFMPEG) and, if necessary, press the button (X) placed at the top of the window dedicated to the purchase / trial of the VIP version of the program, to close it.
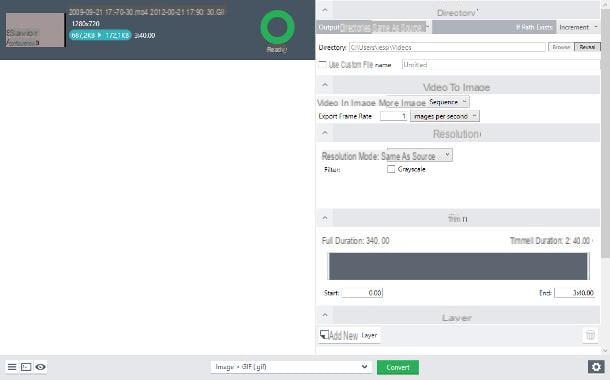
Once you have reached the initial screen of the software, drag the movie you want to convert to GIF in the appropriate box, or click on the button Add files, to select it manually. Once uploaded, if you want to make changes (e.g. cut out only a part of the video), click on the button Modification corresponding to the preview of the video and use the buttons located on the next page to succeed in your intent.
After completing the necessary changes, click on the button OK to save everything and return to the initial screen of the program. Now, locate the drop-down menu Profile, click on it and select the tab first Video (below) and then the voice GIF, residing in the left sidebar. Finally, choose the size in which to export the image, define the folder in which to save it using the box Outcome and click on the button Converted, to start converting the movie and save the GIF in the specified folder. If necessary, close the warning panel relating to the activation of the VIP profile by clicking on X that appears at the top.
In addition to Adapter, there are many other programs that allow you to achieve the same result: to find out more, I suggest you take a look at my guide on how to create animated GIFs.
Giphy (online)
If you can't (or don't want to) install any program on your computer, you can easily turn a video into an animated photo by using one of the many online services used for this purpose. One of the best, in my opinion, is Giphy: the homonymous and famous platform dedicated to sharing animated images, in fact, also hosts a conversion service that allows, among other things, to convert a movie (even cropped) into an animated image. To be able to use it, however, it is essential to register for the service for free.
Once the animated image has been created, it will be stored on Giphy's servers, in public or private mode (ie visible or not to other users): take this aspect into account before doing anything.
All clear? OK let's go. To start using Giphy immediately, connected to this Internet page, click on the button GIF and use the File Explorer / Finder screen to select the movie to convert. At this point, you will be asked to subscribe to the service, or to register: therefore click on the button Create an account and fill out the proposed form with the requested information (email address, username e Password); alternatively, you can speed things up by logging in with Facebook, using the appropriate button. Keep in mind that the duration of the video must be less than 40 seconds.
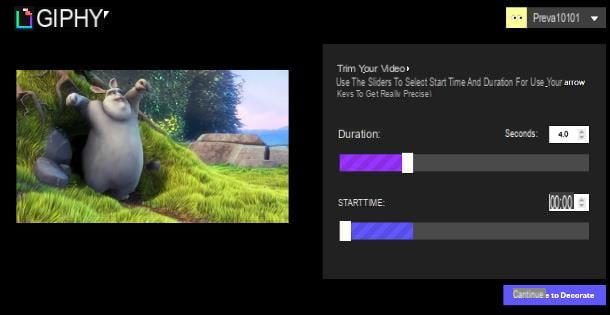
Once loaded, use the side adjuster rods to define the duration and initial part of the movie, click on the button Continue to Decorate and, if you wish, use the buttons located on the next page to add text, filters or other decorative elements.
When you are done, click on the button Continue to upload to display the GIF image loading screen: indicates a name to be assigned to the image within the tsto field Source URL and click on the button OFF located under the heading Public, to ensure that the image, even if present on the server, is not visible to other Giphy users.
Infine, click your button Upload to GIPHY and wait patiently for the movie to be converted into an animated photo. After conversion, you can download the file by clicking on the button first Media and then on the button Download Corresponding to the dicitura source, to obtain the original GIF image, or on the one located in correspondence with the wording Social , to get a file optimized for sharing (less than 10 MB in size).
If Giphy does not satisfy you, you can try one of the many other online services to create GIFs from videos, of which I have told you, in an exhaustive way, in the tutorial that I have linked to you just now.
How to turn a video into a live photo


